Hello, it's me Jill here today to share a special project with you.
Some of you may remember Christine drew a special image for me. She made a stamp called Christmas Bella for my daughter Gabriella. This special stamp is to celebrate Lucia Day.
I am so happy the day is here, 13th december. Gabriella has really looked forward to this day and I have made her a gift.
Some of you may remember Christine drew a special image for me. She made a stamp called Christmas Bella for my daughter Gabriella. This special stamp is to celebrate Lucia Day.
I am so happy the day is here, 13th december. Gabriella has really looked forward to this day and I have made her a gift.
Two weeks ago I found a video tutorial linked by a lovely friend of mine to a fantastic giftbag made by Roben-Marie Smith. I just knew I had to make something similar. I took some photos along the way and I would love to share them with you today.
The tutorial that inspired me is to be found here
This is my giftbag for Gabriella with the gorgeous stamp called
Christmas Bella.
Christmas Bella.
I think she will like it . It is made in a way so that she doesn't have to tear it apart to open it. She wants to save it and keep in her room.
You will need two paperbags, booksheets or similar, an amazing PND image, glue, sewing mashine, dabber or acrylic paint, Frantage and some kind of twine.
Start by gluing the booksheets to one side of the bag. Use the side that dosen't have the flip up or just flip it down. Try to glue the places you won't sew as your sewing machine does not like to much glue.
Sew around the whole base and also sew three times right over the bag. Don't trim the ends to much, but let them hang there for a shabby look.
Now the bag should look like this. Sew together the two paper bags, so that you now have one thick, wonderful bag. Don't sew the top!
Colour your image with Copic (or whatever you prefere)
Ink the edges and mat her on a piece of craft cardstock. Sew around image.
Make two holes in the top of your image and measure where to put the wholes on the bag.
Use a Cropodile.
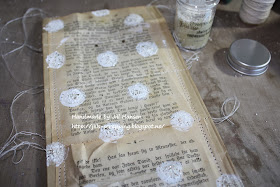
Make dots with a Dabber or Acrylic paint.
I have used Snow Cap, White Dabber. My favorite as I looove white ;)
While the paint is wet put on some Frantage Shabby white and heat it with your heatgun.
Lovely effect from the Frantage.
Put your gift inside.
Bella gets a new Lip gloss that she wanted and two tickets to go to see a movie.
She is going to be superhappy ♥
Here it is ♥
Hope you like my little gift bag.
I loved making it and I will make some more for Christmas as I love to make special gifts for my friends.
Have a wonderful day all
I would love to hear your opinion about my little project, and you can find more on my blog HERE.
Want to have your own Christmas Bella?
You find her HERE in the PND shop, or if you live in Norway you will find this one and a whole lot other Paper Nest Dolls stamps at KREATIV SCRAPPING
HUGS, Jill ♥


LOVEEEEEEEE this Jill. I love how special this is to you and your family...
ReplyDeletethanks for making such a beautiful project =)
very cute jill!! I am making 6 more for a friend, she ordered off seeing the first ones i made! Arent they fun?
ReplyDeleteUnbelievable. This is so awesome!! Thank you for the tutorial and sharing your story with us too. Wishing you and your family peace, joy, an love. Hugs
ReplyDeletewhat a wonderful tutorial jill ... adore christmas bella ... she is such a cutie ... thankyou for sharing will have to have a go at this x hugs jane x
ReplyDeletefantastic xx
ReplyDeleteLove it and the photos are awesome!!
ReplyDeleteNew to this blog and this is darling. I might make one for my sons teacher to put her gifts in. LOVE your blog by the way. :)
ReplyDeleteAwsome!! - I love it!!
ReplyDeleteHugs
Love this.
ReplyDeleteThanks for sharing.
Crafty hugs,
D~
DesignsByDragonfly.blogspot