Showing posts with label Fall. Show all posts

Thursday, September 9, 2021

My Pumkin’ Spice Card

My Design Team Card

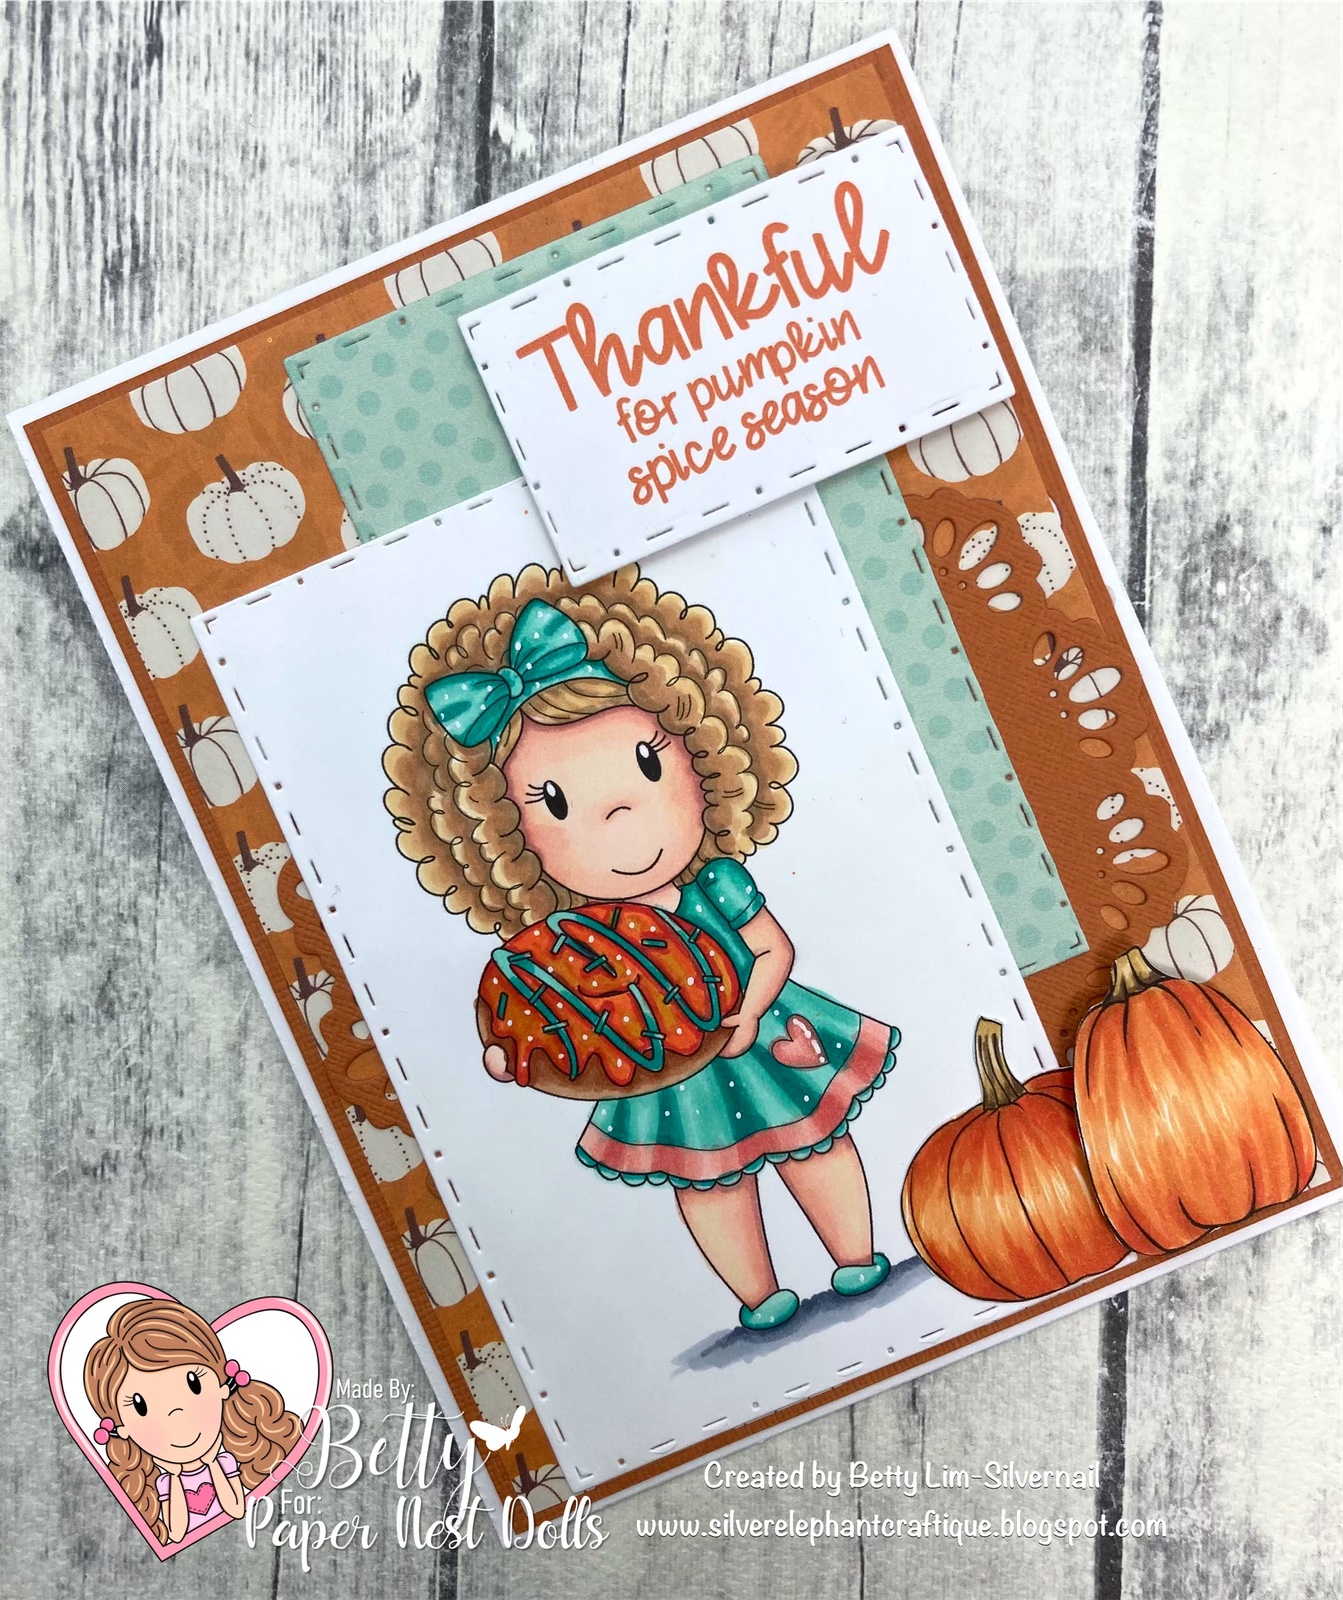
Hello Crafty Friends! It's Laurie here! I am sharing My Pumkin’ Spice Card as my Design Team Inspiration Card for Paper Nest Dolls using the new release Fall Emma. I love this time of year with the cooler weather and the turning of the leaves!

I coloured Emma with my Copic Markers in Autumnal colours with rich oranges and greens. I love her little latte cup and, of course, it needed to be a Pumkin’ Spiced Latte. Not pumpkin, but pumkin’ since that is the way I say it! Lol!

--------------------------

Copic Markers:


Skin: E04/E11/E21/E00/E000/R20
Hair: E49/E47/E44/E43/E42
Coat: YG93/YG95/YG97/YG99/E47/E44
Bow/Collar/Tights: E07/YR04/YR16/YR12
Boots: E49/E47/E44/E43
Pumpkin: YR21/YR12/YR16/YR04/E07/E13/E18/E19
Pumkin’ Latte: E18/E13 (Cup)
E08/YR04/YR12 (Heart)
C3/C0/0 (Lid)
Leaves: E13/E18/E19/YG99/YG97/YG95/E07/YR04/YR16/YR12/Y17/YR24/YR27

Close Up of My Design Team Card

--------------------------

Card Recipe for My Pumkin’ Spice Card:


Fall Emma, Paper Nest Dolls
Paper Basics - Stamper's Select White Cardstock, Papertrey Ink
Happy Fall 6” x 6” Paper Pad, Echo Park Paper Co.
Hello Autumn 6” x 6” Paper Pad, Carte Bella Paper Co.
Hello Autumn Frames and Tags, Carte Bella Paper Co.
In Good Taste Design Series Paper, Stampin’ Up!
Picket Fence Die-namics, My Favorite Things
Seasonal Layers Thinlits, Stampin’ Up!
Coffee Cups Framelits Dies, Stampin’ Up!
Patterned Pumpkins Thinlits, Stampin’ Up!
Holiday Rhinestones Basic Jewels, Stampin’ Up!
Leaf Tags, Craft Smart, Michaels’ Arts & Crafts
Mossy Meadow, Pumpkin Pie, Cajun Craze,
Crumb Cake and Basic White Card Stock, Stampin’ Up!

Finished card size: 5.5” x 5.5”

--------------------------

Hope you like my Design Team card using
Fall Emma by Paper Nest Dolls!

Thank you for stopping by!

Hugs,
Laurie


Saturday, November 14, 2020

Thankful for Pumpkin Spice Season!

Hello Paper Nest Dolls Fans! Pumpkin spice is one of those flavors I love in baked goods, but not so much in drinks. My favorite is pumpkin spice cake donuts. I wish I can find a donut as big as Amara! Isn't she just adorable with that donut almost as big as her hair?! This stamp is available from Paper Nest Dolls in red rubber and in digital formats. This stamp is versatile and can be used for many occasions, such as birthday, thank you, friendship, etc.


I made this A2 card using the digital format (digi stamp) and colored it using Spectrum Noir Illustrator markers. This is a fun and easy card to make. Give it a try!


Supplies:
  • Paper Nest Dolls Stamp -  red rubber or digital.
  • White card stock cut to A2 size (4-1/4” x 5-1/2”) for base card
  • White card stock to stamp or print stamp image
  • Orange card stock cut to 4-1/8" x 5-3/8"
  • Pumpkin or fall patterned paper cut to 4" x 5-1/4"
  • Green pattern paper for accent cut to 2-1/4" x 3-3/4"
  • Doily die - if you don’t have a doily die, use a circle die with a scalloped edge
  • Sentiment - I created mine on my computer using Microsoft Word, printed, and cut it with a stitched rectangle die. Alternative is to use a stamp and cut it with a paper trimmer.
  • Pumpkin die cuts or digital stamps (two) -I used my Silhouette to cut out a digital stamp.
  • Paper trimmer or rectangle nesting dies
  • Your favorite adhesive
  • Adhesive foam dots or foam squares
  • Your favorite coloring medium - I used Spectrum Noir Illustrators
Spectrum Noir markers used:
  • Hair: MB2, TN3, TN2, TN1
  • Skin: AP3, FS8, FS7, FS6, FS9
  • Cheeks: FS4
  • Donut: TN7, TN5, TN3
  • Frosting: OR3, OR1, B01, LY1
  • Green: GT3, GT2, GT1, CR1, CR3, CR6
  • Shadow: IG6, IG2
  • Pumpkins: GB4, OR1, B03, B01
  • Pumpkin stem: GB4, EB4, TN1
Instructions:
  • Stamp or print image on white card stock 
  • Color the stamp 
  • Cut out the image using a paper trimmer or rectangle die
  • Adhere the layers of papers as shown on the card below. Be sure to use foam dots or squares for the sentiment and the top pumpkin.
 Thank you for stopping by. Have a wonderful pumpkin spice season! If you have any questions or comments, please leave them below. ~Betty~

Sunday, October 18, 2020

Let's Make a Fall Card with Ellie!

Hello PND Fans! It's Betty here with a cute Fall card. It's been another hot week in the 90s here in the Sacramento, California area, but the weather forecast says cooler days are coming. We need the cooler weather for the trees to change colors. I love the beautiful fall colors, just like the colors in this card I made with Paper Nest Dolls' Ellie with Scarecrow stamp. Isn't she just the cutest? This stamp comes in red rubber and in digital


This card is easy to make and you can use any fall colors and patterned paper you have in your stash. All you need are some leaves die cuts and the fence die cut, which is optional. Let's get started!

Supplies:
  • Paper Nest Dolls stamp (links above): I used the digital stamp and printed the image at 3-1/2" tall.
  • Color your stamp using the medium of choice. I used Copic markers (colors are listed below)
  • Distress ink or Distress Oxide - Tumbled Glass
  • Ink Blending Tool
  • Brown cardstock to mat the colored image (2-7/8" x 4-3/8") 
  • White base cardstock: 12" x 6" folded in half
  • Patterned paper, fall design: 5-3/4" x 5-3/4"
  • White cardstock for layering: 4-1/2" x 4-1/2"
  • Solid or tone-on-tone patterned paper for layering (I used orange with dots): 4-3/8" x 4-3/8"
  • Yellow, green and orange cardstock for leaves
  • Leaves die
  • Fall sentiment: I used Microsoft Word and printed the sentiment at 1-1/2" x 3/4" and used my paper trimmer to cut it out at 2-7/8" x 1"
  • Brown cardstock for matting the sentiment at 2" x 1-1/8"
  • Optional item: fence die cut. I used a die from Gina Marie Designs and used a cardstock that had a wood-like pattern.
  • Your favorite adhesive
Copic markers used:

Ellie:
  • Hair: E39, YR24, YR23, YR20
  • Skin: E04, E11, E21, E00, E000
  • Cheeks: R20
  • Orange: YR27, YR16, YR14M YR12M YR00
  • Green: YG17, YG13, YG03, YR21
  • Gray (Boots): T5, T3, T1
Scarecrow:
  • Face: E43, E42, E41, E40
  • Orange: YR27, YR16, YR14M YR12M YR00
  • Gray: T5, T3, T1
  • Center of sunflower & pole: E43, E42, E41, E40
  • Yellow: Y17, Y15, Y11
Instructions:
  • Stamp or print your image onto white cardstock
  • After coloring your stamp, ink the sky using the Distress/Oxide ink with a blending tool. 
  • Using a paper trimmer or rectangular die, cut out your stamp at 2-3/4" x 4-1/4".
  • Stamp or print your sentiment and cut to the size listed in the supplies list
  • Using a paper trimmer, cut all the cardstock listed in the supplies list
  • Die cut all your dies listed in the supplies list
  • Layer and glue all the pieces together as shown below

Thank you for stopping by and I hope you give this cute fall card a try. If you have any questions or comments, please leave them below. ~Betty~


Tuesday, September 29, 2020

Emma with Squirrel

Hi Paper Nest Dolls Fans! It's Betty here.  Even though it's Fall here in the USA, it's still close to 100 degrees here in Sacramento, California. Fall weather is just around the corner. When I walk in the park, I see the squirrels gathering up all the acorns to store for the winter. It looks like Emma has a pet squirrel and is helping it collect some acorns! Isn't this just too cute? Emma with Squirrel is a digital stamp, which means you can make the image as big or as small as you like. 

I colored this stamp with Copic markers. The colors are listed below.


Copic colors used:
Hair: E44, E43, E42, E41
Skin: E04, E11, E21, E00, E000
Cheeks: R20
Dress (Aqua): BG05, BG02, BG01, BG000
Dress (Gray): W5, W3, W1, W0
Wagon (Brown): E44, E43, E42
Wagon (Silver/Gray): T3, T2, T1
Wagon Tires: T7, T5, T3
Squirrel: E18, E09, E11
Acorn: E37, E25, E55
Pumpkins: YR07, YR04, YR02, E15, E13, E11

Thank you for visiting and have a wonderful day! If you have any questions or comments, please leave them below.


Monday, October 21, 2013

Happy Fall Y'all!


Howdy Y’all…..

Its Doll Loriann here….

Hope you are all great today… We have been having
Some great weather here in sunny
 Southern California in the 80’s nice……

Any way….   onto my card…… today I
colored up Pilgrim Owen 
 I can’t believe how  Adorable Owen is.
I have matched it up with doodlebug paper and 
A cute orange bow……
And here is my creation adorable I know……


Up close of the image and coloring…..


Side view …..


Side view....


Arty view......


 Here is the packaging for Pilgrim Owen 
as you can see my coloring was used
YEAH!


Supplies used

Image – Pilgrim Owen
Paper – doodlebug happy harvest 
DCWV 
Cameo –pumpkin
Embellishments – button, ribbon, bling
Copic –


Thank you for looking…. have a wonderful day,
Come back soon to see what else we have to share
With you…..
Loriann 

Friday, September 13, 2013

Lil Miss Fall-By Jenn Cochran

Hello PND friends and followers.  Happy Friday.  I am excited to share with you today a really fun fall themed card featuring "Lil Miss Hollywood".  Love how versatile this cutie really is.  I totally get a Shirley Temple vibe from her....Don't you?  Love it!!! 


I played around with Photoshop and "cookie cut" out the top portion of her body and them blew her up!  Love how much fun digi's can be.  


Thanks for joining me today!  Visit my blog for more PND inspriation.  ALSO, On Sept. 19 I will be featuring a tutorial on how I rolled those adorable ribbon flowers!
Supplies:
Ribbon: Really Reasonable Ribbon-September Ribbon Club
Image: Paper Nest Dolls-Lil Miss Hollywood
Paper: MME-Remarkable
Copics:
YR-000,09,12,15,21,24,68
E-000,04,11,21,59
R-20,39,46,89
Y000,21,32
C00,7
B-0000,02


copyright © 2013 the paper nest · graphics by erica belton · web design by red peach designs