Showing posts with label slimline card. Show all posts

Friday, August 9, 2024

Game On Birthday Card


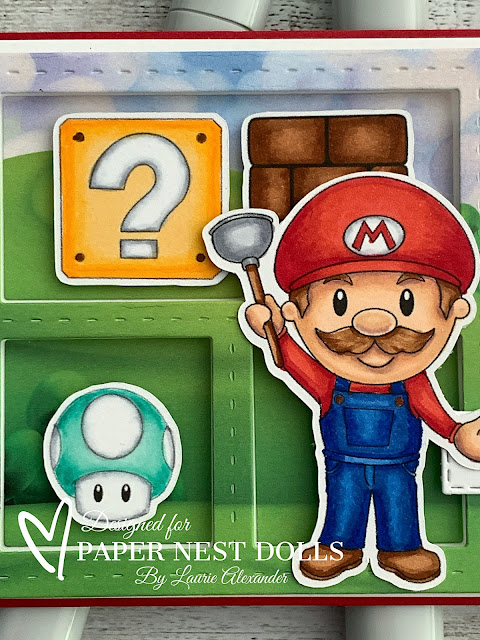
Hello Crafty Friends! It's Laurie here! I am sharing my Game On Birthday Card using the Plumber Brothers and Company by Paper Nest Dolls for my Design Team Inspiration Card. This Set comes with 14 digital stamps, and I used 8 of them on my card.

The Details of My Game On Birthday Card

Everyone loves the classic Mario Brothers video game! For my card, I wanted to create their world using the different elements that they must encounter. So, I coloured my stamps with my Copic markers in bright primary colours.


Next, I decided to use the Enchanted Kingdom Slimline Designer Paper by Whimsy. The primary colours and scene were perfect for my Mario world!

I die cut this slimline paper with the Slimline Windows Dies by Whimsy to create the different levels in which I could insert my elements. I popped up the frame using adhesive strips to limit the sagging especially along the top and bottom edges. Next, I adhered with liquid glue the leftover die cut scene squares to the card base to create dimension. Tip: liquid glue gives you time to position the squares and allow wiggle room to get them just right.


Once the scene was in place, I added my elements to the different squares to create my Mario world.


The sentiment was stamped in black and die cut out with a stitched rectangle. I added a star to one side to help with the balance.

The finishing touch was to add Mario and Luigi to the card. VoilĂ ! Game On! My Mario world was complete!

--------------------------

Copic Markers:

Mario
Skin: E000/E00/E21/E11/E04
Hair: E37/E35/E33
Top/Hat: R29/R27/R24
White: C3/C1/0
Overalls: B29/B26/B24
Browns: E37/E35/E33
Plunger: C4/C3/C1/E37/E33


Luigi
Skin: E000/E00/E21/E11/E04
Hair: E37/E35/E33
Top/Hat: G07/YG09/G16
White: C3/C1/0
Overalls: B29/B26/B24
Browns: E37/E35/E33


Elements
Reds: R29/R27/R24
Greens: G07/YG09/G16
Yellows: Y38/Y35/Y32
Whites: C3/C1/0
Browns: E37/E35/E33
Blue/Greens: BG13/BG11/BG10

--------------------------

Card Recipe for My Game On Birthday Card:

Paper Basics - Stamper's Select White Cardstock, Papertrey Ink
Enchanted Kingdom Slimline Designer Paper, Whimsy Stamps
Slimline Windows Dies, Whimsy Stamps
Level Up Stamp Set, My Favorite Things
Versafine Onyx Ink, Tsukineko's
Rectangle Stitched Dies, Stampin’ Up!
Foam Adhesive Strips, Stampin’ Up!
Multipurpose Adhesive Glue, Stampin’ Up!
Real Red and Basic White Card Stock, Stampin’ Up!

Finished card size: 8 ½” x 3 ½”

--------------------------

Hope you like my Design Team card using
Plumber Brothers and Company by Paper Nest Dolls!

Thank you for stopping by!
Hugs,
Laurie


Wednesday, December 6, 2023

Yeti for the Holidays?


Hello Crafty Friends! It's Laurie here! I am sharing my Yeti for the Holidays? as my Design Team Inspiration Card for Paper Nest Dolls using Yeti Father and Son. I just love these cuties. There is a Yeti Mom and Baby that you could add to this card for the whole family! Lol!

The Details of My Yeti for the Holidays?

I had a lot of fun colouring these two with my Copic markers! I decided to create a fur texture with individual strokes in the shadows and left the highlights white. The tree was also coloured with individual strokes to create texture. The Father Yeti’s tie pulled together my colour scheme of red and green.

For my card, I wanted to use the Whimsy paper with these cuties. This paper is perfect for those wintery scenes! In fact, I used it for another card that I made a few years ago and will post it at the end.

So, I created a slimline card using the Dotted Slimline Dies by Studio Katia. I used all three dies that came in the set to create my card. I thought it would be fun having the yetis stepping out of the wintery scene with their Christmas tree.

To complete my wintery scene and to add interest, I used a Stitched Hillside Die to add an extra layer to the scene. I made sure that my “snowbank” did not cover up the snow-covered trees on the background.

Next, I typed and printed my sentiment out on my computer. There are so many great sentiments out there that it was hard to pick one! Lol! The sentiment was die cut out with another stitched die.

For embellishments, I used some wooden snowflakes that I had in my stash for that rustic look and a scattering of red rhinestones to add sparkle.

--------------------------

Copic Markers

Fur: W3/W1/W0/0
Faces: E43/E42/E41/E40/RV00/0
Horns/Nails/Tree Trunk: E44/E43/E42/E41
Reds: R29/R27/R24/R22
Greens: G29/YG63/YG03

--------------------------

Card Recipe for My Yeti for the Holidays?

Yeti Father and Son, Paper Nest Dolls
Paper Basics - Stamper's Select White Cardstock, Papertrey Ink
Frozen Slimline Designer Paper Pack, Whimsy Stamps
Dotted Slimline Dies, Studio Katia
Slimline Stitched Hillside Border Dies, Lawn Fawn
Stylish Shapes Dies, Stampin’ Up!
Wooden Snowflake Embellishments, Stampin’ Up!
Red Rhinestone Jewels, Stampin’ Up!
Garden Green and Real Red Card Stock, Stampin’ Up!

Finished card size: 8 ½” x 3 ½”

Stamp Size: 3”

--------------------------

My Merry Penguins Card

For more information on my other card, please click here.

Hope you like my Yeti for the Holidays? Card using
Yeti Father and Son by Paper Nest Dolls!

Thank you for stopping by!

Hugs,
Laurie

Wednesday, May 31, 2023

My MerMay Card


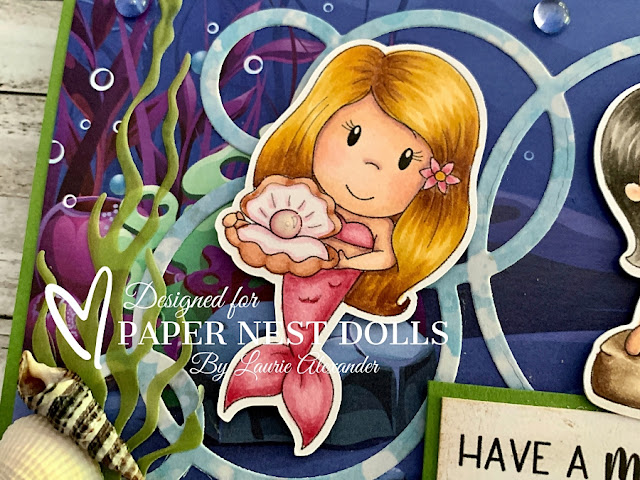
Hello Crafty Friends! It's Laurie here! I am sharing My MerMay Card using the Mermaid Set by Paper Nest Dolls for my Design Team Inspiration Card. This Set comes with 12 digital stamps, and I use 3 of them on my card.

The Details of My Card

For my card, I decided to create an underwater scene using the Under the Sea Slimline Designer Paper by Whimsy. Once I decided which sheet of paper to use, I coloured my mermaids with my Copic markers in different colours to match my paper,

I die cut the Whimsy Bubbles in a lighter blue designer paper to make them stand out from the background and highlight my mermaids. Then I placed my mermaids so that they each centered on the circles with the one sitting on the rock overlapping the sentiment. The sentiment was sitting on my desk leftover from another mermaid card. Crumb Cake ink was brushed over the sentiment to give it a sandy feel.

Next, I added real shells in the bottom corners on top of some pink and green vellum die cut seaweed. A silver seahorse charm was added to the sentiment using my Flush Wire Cutter to cut off the loops on the charm to make it lie flat. Tip: use Glossy Accents to create a strong adhesive hold for shells and charm.

I added a scattering of clear bubble embellishments to mimic air bubbles in the water and add dimension.

Clear Wink of Stella was added to the mermaids’ tails and starfish to give them a subtle shimmer and Glossy Accents to the pearl and braid tie for the Green Mermaid. 

--------------------------

Copic Markers:

Mermaid in Pink
Skin: E000/E00/E21/E11/E04/R20
Hair: E25/YR24/Y38/Y35
Outfit: R85/R83/R81
Pearl: R83/R81/0/ Glossy Accents
Pearl Bed: R81/0
Shell: E15/E13/E11
Flower: R85/R83/YR24


Mermaid in Purple
Skin: E000/E00/E21/E11/E04/R20
Hair: W9/W7/W5/W3
Outfit: V17/V15/V12
Rock: E47/E44/E43/E41
Shell: E15/E13/E11


Mermaid in Green
Skin: E000/E00/E21/E11/E04/R20
Hair: E49/E47/E44/E43/E42
Outfit: YG67/YG63/YG03
Starfish: YR18/YR04/Y38/Y35


--------------------------

Card Recipe for My MerMay Card:

Mermaid Set, Paper Nest Dolls
Paper Basics - Stamper's Select White Cardstock, Papertrey Ink
Rosealea Mermaid And Sentiment Bundle, Conie Fong Art & Design
Under the Sea Slimline Designer Paper, Whimsy Stamps
Perennial Essence Vellum Cardstock, Stampin’ Up!
Foil Designer Paper 12” x 12”, Craft, Dollar Store
Build an Ocean Die Set, Whimsy Stamps
Slimline Connected Bubbles Dis, Whimsy Stamps
Spring Blooms Embellishments, The Robin’s Nest
Seahorse Charm, Bead Landing
Shells from Dollar Store 
Crumb Cake Ink Pad, Stampin' Up!
Blending Brushes, Stampin' Up!
Clear Wink of Stella, Stampin’ Up!
Glossy Accents, Ranger
Flush Wire Cutter
Cucumber Crush Card Stock, Stampin’ Up!

Finished card size: 8 ¾” x 3 ¾”

--------------------------

Hope you like my Design Team card using
Mermaid Set by Paper Nest Dolls!

Thank you for stopping by!

Hugs,
Laurie

Tuesday, August 16, 2022

My Doll Detectives’ Slimline Box Card

My Doll Detectives’ Slimline Box Card

Zoinks! Hello Crafty Friends! It’s Laurie here! I am sharing My Doll Detectives’ Slimline Box Card using Doll Detectives by Paper Nest Dolls for my Design Team Inspiration Card. This bundle comes with 6 digital stamps including 2 boys, 2 girls, a dog, and a van.

The Details of My Card


I had so much fun colouring these cuties with my Copic markers that I made another card with them, but a slimline box card instead! I will add a link to the other card I made at the end of this post.

For my card, I thought a torture scene would be perfect for them using Enchanted Kingdom and Enchanted Forest Slimline Paper by Whimsy Stamps. This paper makes creating scenes so easy because it’s so detailed. Since the paper is so amazing, I decided to use the whole sheet, even though my card would be larger than a usual slimline.


To create my scene, I decided to a box card would be fun allowing for 3 different layers on the front and another one for the back of the card. For each layer, I sponged a stencil to create the cobbled floor and road.


For my sentiments, I thought speech bubbles with their iconic sayings would be such fun! So, I created them in Microsoft Word and used my Brother Scan & Cut to cut them out. For Jinkies and Jeepers, I wanted them to hover above the girls’ heads. Hence, I used a thin strip of window sheet for each and glued them to the layer behind them. I will include a link to a PDF of the sentiments that I created that you could download at the end.

The only embellishment that I added was the cute magnifying glass beside the main sentiment. Tip: use Glossy Accents to glue it to the card. I found it worked the best.

————————–

Copic Markers:


Girl 1
Skin: E000/E00/E21/E11/E04/R20
Hair: E57/E37/E08/E15/YR27
Shirt: YR68/YR65/YR61
Skirt: E37/E08/E15
Magnifier: W4/0
Glossy Accents on Glasses and Magnifier


Boy 1
Skin: E000/E00/E21/E11/E04
Hair: E57/E25/E99/YR27/YR24
Shirt: G07/YG09/YG05
Pants: E37/E08/E15
Shoes: W8/W6/W4
Sandwich: E50/E51/YG03/Y17/YR24/R08


Dog
Fur: E27/E25/E23
Collar: B18/B26/B24/B12
Tongue/Ears: RV00/R20
Nose/Spots/Eyebrows: W8/W6
Dog Tag: C3/C1

Boy 2
Skin: E000/E00/E21/E11/E04
Hair: YR24/Y35/Y13/Y11/Y00
Sweater: C3/C1/C0/0
Pants: B18/B26/B24/B12
Scarf: YR09/YR16/Y17
Shoes: E50/E53/E55


Girl 2
Skin: E000/E00/E21/E11/E04/R20
Hair: E08/YR18/YR07/YR04/Y17
Scarf: G07/YG09/YG05
Dress/Shoes/Headband: BV04/BV02/BV00
Stripes/Tights: V12/V01/RV00

Van
Green: G07/YG09/YG05
Blue: BG57/BG45/BG53
Wheels: C9/C7/C5
Steel Parts: C5/C4/C3
Flowers: YR09/YR16/Y17


————————–

Card Recipe for My Doll Detectives’ Slimline Box Card:


Doll Detectives, Paper Nest Dolls
Paper Basics – Stamper’s Select White Cardstock, Papertrey Ink
Enchanted Kingdom Slimline Paper Pack, Whimsy Stamps
Enchanted Forest Slimline Paper Pack, Whimsy Stamps
Window Sheet, Stampin’ Up!
Microsoft Word for sentiments
Brother Scan & Cut
Rocky Road Stencil, Kraftin’ Kimmie Stamps
Blending Brush, Stampin’ Up!
Basic Gray Ink Pad, Stampin’ Up!
Glossy Accents, Ranger
Tranquil tide, Basic Black, and Basic Gray Card Stock, Stampin’ Up!

Finished card size: 8 6/8” x 3 6/8”


————————–

To download a PDF of my Doll Detectives’ sentiments, please click here.

Here is the other Doll Detective card that I made. Please click here to find out more about this card.


Hope you like my Design Team Inspiration Card using Doll Detectives by Paper Nest Dolls!

Thank you for stopping by!

Hugs,
Laurie

Tuesday, May 31, 2022

Yabba Dabba Doo! Happy Father's Day to You!

Hi PND Fans! It's Betty here today.  Paper Nest Dolls released the cutest prehistoric family stamp set called Stone Age Family that was inspired by one of my favorite childhood cartoons! This set comes with eight adorable stamps and it comes in both digital and red rubber stamps. It's time to start making some Father's Day cards and this stamp set is perfect for them. So fun to create cards, scrapbook pages, decorations, and more! 

I made this large slimline card that I can showcase several of the stamps with a cute, but simple scene. This slimline card measures 4"W x 9"H. I printed the stamps in the following sizes:
  • House: 2-1/2"H
  • Dinosaur: 2-3/4"H
  • Girl: 2-1/2"H
  • Boy: 2-1/2"H
After printing the stamps, I colored them with Copic markers then fussy cute them out.

Copic markers used:
House: W6, W4, W3, W2, W1
Window: T3
Door: B97, B95, B93, B91
Plants: G99, G94, YG63

Dinosaur:
Purple: V17, V15, V12
Muzzle: V15, V12, V01
Black: C9, C7, C5, C3
Blue: B97, B95, B93
Yellow: Y38, Y35
White: W4, W2, W0, 0


Girl:
Skin: E04, E11, E21, E00, E50
Cheeks: E93
Hair: E18, E08, YR18, YR14
Blue: B97, B95, B93
Green: G28, G24, G21
Black: C9
White: W4, W2, 0

Boy:
Skin: E13, E11, E21, E00, E50
Cheeks: E93
Hair: C3, C1, C00
Brown: E79, E77, E74
Bone (White): W3, 0
Yellow: YR27, YR24, YR21


The background is created by using stencils. I used a cloud stencil from Stamp Anniething and Distress Oxide in in Tumbled Glass to create the sky. I masked off the walkway and used Distress Ink in Pumice Stone to create the dirt. I used a cobblestone stencil from Stamp Anniething and the Pumice Stone ink to create the walkway. 

I used a Wonky Stitched Slimline Die from Scrappy Boy Stamps to cut out the card front. I created the sentiment on my computer, printed it, trimmed it, then added a black cardstock mat and adhered it to the card. To finish the card, I adhered the card front onto the slimline card base. 


These stamps are so fun to color! I hope you give this card a try! Thank you for visiting today and I hope you have a wonderful and creative day! 

Tuesday, March 15, 2022

From the Herd Birthday Card

From the Herd Birthday Card

Hello Crafty Friends! It's Laurie here! I am sharing my From the Herd Birthday Card using Down on the Farm by Paper Nest Dolls for my Design Team Inspiration Card. This bundle comes with 15 digital stamps including 5 dolls, horse, cow, pig, ewe, chicken coop, tractor, hay, corn, sunflowers and so many more.

The Details of My Card

For my card, I decided to create a slimline card to fit my characters. So, I used my new Picket Fences Diecutting System with the circle dies since one was a fence and the other was grass. Perfect for my farm card! I die cut the fence out of some paper that looked like wood. I added sky paper behind the cow and horse but added a farmer’s field paper behind the girl and pig. To add to my farm theme, I use some wooden boards paper to create my vignettes of the scenes. I wanted the girl and pig to stand out. So, I placed them in front of everything on the die cut grass that has the stamped sentiment. Don’t you just love the sentiment, “Happy Birthday from the Herd. Lol!

--------------------------

Copic Markers:

Horse
Coat: E37/E35/E33
Mane: E53/E51/E50
Hoofs: C6/C4/C3


Girl Farmer
Skin: E000/E00/E21/E11/E04
Hair: E29/E27/E25/E23
Shirt/Boots: R29/R27/R24/R22
Pants: B26/B23/B12
Hat: E35/E33/E31/R29/R27/R24/R22

Pig
Skin: YR02/YR00/E01/E000
Hoofs: C6/C4/C3


Cow
Hide: C7/C6/C4/C3/C0/0
Hair: C3/C0
Hoofs: C6/C4/C3
Horns: E41/E40/0


--------------------------

Card Recipe for My From the Herd Birthday Card:

Down on the Farm, Paper Nest Dolls
Paper Basics - Stamper's Select White Cardstock, Papertrey Ink
I {Heart} Summer Paper Pad, Simple Stories
Cock-a-doodle-doo! Paper Pad, Kaiser Craft
In Good Taste Designer Series Paper, Stampin’ Up!
Heart & Home Designer Series Paper, Stampin’ Up!
Gingham Garden Designer Series Paper, Stampin’ Up!
Slim Line Diecutting System, Picket Fence Studios
Build a Fairy Garden Die Set, Whimsy Stamps
Windmill Fields Dies, Stampin’ Up!
Tulip Fields Stamp Set, Stampin’ Up!
From the Herd Stamp Set, Stampin’ Up!
VersaFine Black Ink, Tsukineko
Pool Party Classic Ink Pad, Stampin Up!
Old Olive and Basic White Card Stock, Stampin’ Up!

Finished card size: 8.5” x 3.5”

--------------------------

Hope you like my Design Team card using
Down on the Farm by Paper Nest Dolls!

Thank you for stopping by!

Hugs,
Laurie


Saturday, February 26, 2022

Happy Birthday to a Friend Like GNOME Other

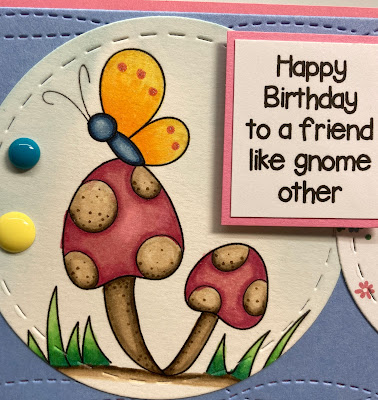
Hello PND Fans! Betty here today with a slimline card featuring stamps from the fabulous Gnome Set. This set includes 4 gnomes, a gnome house, and 5 stamps to build a scene. Such a fun set for making some fun projects. I made this slimline birthday card using two of the gnomes and the mushroom-butterfly stamp.


First I printed the digital stamps 3" tall. I colored them with Copic markers then fussy cut the gnomes and used a 3" stitched circle die to cut the mushroom-butterfly.


Copic markers used:
Girl Gnome:
Skin: E04, E11, E21, E00, E000
Hair: E39, YR24, YR23, YR20
Blue: B97, B95, B93, B91
Pink: RV34, RV32, RV00
Green: G16, G14, YG11
Yellow: Y38, Y17, Y15
Brown: E44, E43, E42, E41


Boy Gnome:
Skin: E04, E11, E21, E00, E000
Hair: T9, T5, T3
Yellow: Y38, Y17, Y15, Y13
Blue: B97, B95, B93, B91
Green: G16, G14, YG11
Silver: C5, C3, C1
Brown: E44, E43, E42, E41


Mushrooms:
Brown: E44, E43, E42, E41
Pink: RV34, RV32, RV00
Green: G16, G14, YG11
Yellow: Y38, Y17, Y15, Y13
Blue: B97, B95, B93, B91

I used a 2-1/2" stitched circle die to cut the patterned paper. The paper is from Photoplay. I used an 8" x 3-1/8" wacky slimline stitched die to cut the card front and mounted it onto pink cardstock with an 1/8" border then mounted this onto a slimline card base of white cardstock. 

I created the sentiment on my computer using MS-Publisher, printed, and trimmed it then added a pink mat. I adhered the circles using liquid glue then adhered the two gnomes using double-sided adhesive foam tape. 


Thank you for stopping by today! These cute stamps are fun and easy to color. Perfect cards, scrapbooks, gift tags, treat boxes, and more! Hope you give it a try. 

Have a wonderful day! ~Betty~

Tuesday, January 11, 2022

My Groovy Slimline Birthday Card

 My Groovy Slimline Birthday Card

Hello Crafty Friends! It's Laurie here! I am sharing my Groovy Slimline Birthday Card using Doll Detectives by Paper Nest Dolls for my Design Team Inspiration Card. This bundle comes with 6 digital stamps including 2 boys, 2 girls, a dog, and a van.

The Details of My Card

For my card, I decided that I would create a CAS (clean and simple) slimline card to fit all my cute characters. So, I layered my PNG stamps in Word to create my scene and then coloured them with my Copic markers.

I thought it would be fun to add some flowers to the sky to add interest. So, I took my digital van and blew up only the flowers, coloured them and fussy cut them out. You have to love being able to do that with digital stamps! Once they were cut out, I outlined them in a black multiliner to cover up any areas where my fussy cutting wasn’t perfect. It also allowed them to pop from the page.

For my sentiment, I decided to cut it up to fit on the side of the van like a banner of sorts with another flower and a sequin. The only die I used was the stitched one to cut out my scene. My finishing touch was a couple of other sequins.

--------------------------

Copic Markers:

Girl 1
Skin: E000/E00/E21/E11/E04/R20
Hair: E57/E37/E08/E15/YR27
Shirt: YR68/YR65/YR61
Skirt: E37/E08/E15
Magnifier: W4/0
Glossy Accents on Glasses and Magnifier


Boy 1
Skin: E000/E00/E21/E11/E04
Hair: E57/E25/E99/YR27/YR24
Shirt: G07/YG09/YG05
Pants: E37/E08/E15
Shoes: W8/W6/W4
Sandwich: E50/E51/YG03/Y17/YR24/R08

Dog
Fur: E27/E25/E23
Collar: B18/B26/B24/B12
Tongue/Ears: RV00/R20
Nose/Spots/Eyebrows: W8/W6
Dog Tag: C3/C1


Boy 2
Skin: E000/E00/E21/E11/E04
Hair: YR24/Y35/Y13/Y11/Y00
Sweater: C3/C1/C0/0
Pants: B18/B26/B24/B12
Scarf: YR09/YR16/Y17
Shoes: E50/E53/E55


Girl 2
Skin: E000/E00/E21/E11/E04/R20
Hair: E08/YR18/YR07/YR04/Y17
Scarf: G07/YG09/YG05
Dress/Shoes/Headband: BV04/BV02/BV00
Stripes/Tights: V12/V01/RV00

Van
Green: G07/YG09/YG05
Blue: BG57/BG45/BG53
Wheels: C9/C7/C5
Steel Parts: C5/C4/C3
Flowers: YR09/YR16/Y17
White Gelly Roll Pen on Window


Flowers in Sky: YR09/YR16/Y17/Clear Wink of Stella
Road: C5/C4/C3
Sky: B0000/B000/B00/0

--------------------------

Card Recipe for My Groovy Slimline Birthday Card:

Doll Detectives, Paper Nest Dolls
Paper Basics - Stamper's Select White Cardstock, Papertrey Ink
Sentiment, Kindred Stamps
Large Slimline with Sliders Dies, Lawn Fawn
Artistry Blooms Adhesive-Back Sequins, Stampin’ Up!
Glossy Accents, Ranger
White Gelly Roll Pen, Sakura
Clear Wink of Stella, Stampin’ Up!
Multiliner Black Ink Pen, 0.3mm Tip, Copic Marker
Granny Apple Green Card Stock, Stampin’ Up!

Finished card size: 8 6/8” x 3 6/8”

--------------------------

Hope you like my Design Team card using
Doll Detectives by Paper Nest Dolls!

Thank you for stopping by!

Hugs,
Laurie

Thursday, November 25, 2021

My Merry Penguins Card

My Merry Penguins Card

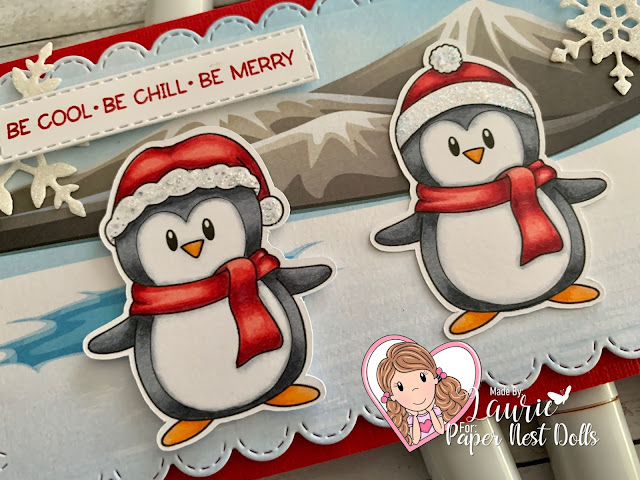
Hello Crafty Friends! It's Laurie here! Christmas is only a month away and I’m still working on my Christmas cards. I am sharing My Merry Penguins Card as my Design Team Inspiration Card for Paper Nest Dolls using the digital stamp called Penguin Holiday Set

For this super-fast card, I decided I wanted a winter scene for these cuties. And what better way than a slimline card to fit all the penguins on it. So, I pulled out my Frozen Whimsy Stamps Paper Pack! These cute penguins are such a fast colour with my Copic Markers! All I needed to finish off my card were a few snowflakes die cut from some glimmer paper and my sentiment. Easy-peasy!

--------------------------

Copic Markers:

Feathers: C7/C5/C4/C3/C0/0
Feet/Beaks: TR04/Y38/YR12
Reds: R39/R37/R35/R32
Whites: C3/C0/0/Stardust Stickles


Close Up of Two Penguins on My Card
--------------------------

Card Recipe for My Merry Penguins Card:


Penguin Holiday Set, Paper Nest Dolls
Paper Basics - Stamper's Select White Cardstock, Papertrey Ink
Frozen Slimline Designer Paper Pack, Whimsy Stamps
Dazzling Diamonds Glimmer Paper, Stampin’ Up!
Slimline Pull Tab Dies, Heffy Doodle
So Many Snowflakes Dies, Stampin’ Up!
Stitched Rectangle Dies, Stampin’ Up!
Penguin Place Stamp Set, Stampin’ Up! (Sentiment)
Real Red and Basic White Card Stock, Stampin’ Up!
Stardust Stickles, Ranger

Finished card size: 3 5/8” x 8 5/8”

Close Up of Penguin on My Card

--------------------------

Hope you like my Design Team card using
the Penguin Holiday Set by Paper Nest Dolls!

Thank you for stopping by!
Hugs,
Laurie
copyright © 2013 the paper nest · graphics by erica belton · web design by red peach designs