Showing posts with label winter. Show all posts

Monday, January 22, 2024

Season to be Freezin’ Card

Hello Crafty Friends! It's Laurie here! I am sharing my Season to be Freezin’ Card as my Design Team Inspiration Card for Paper Nest Dolls using Yeti with Tree. Paper Nest Dolls has several Yeti stamps to the point you could have a whole Yeti family!

The Details of My Season to be Freezin’ Card

For my Yeti, I had coloured him with my Copic markers before Christmas but didn’t get a chance to get him onto a card. So, I decided to create a winter themed card for him. I coloured his fur texture with individual strokes in the shadows and left the highlights white. The tree was also coloured with individual strokes to create lots of texture.

The Doodlebug paper that I used, had Yetis on it, but I went with more neutral papers to create my wintery scene. The sentiment was from the matching Chit Chat and was perfect for my wintery theme.

Next, I added a birch tree die cut for my wintery scene and, to add interest, I used a Stitched Hillside Die to complete my scene.

For embellishments, I used some wooden snowflakes that I had in my stash for that rustic look.

--------------------------

Copic Markers

Fur: W3/W1/W0/0
Face: E43/E42/E41/E40/RV00/0
Horns/Nails/Tree Trunk: E44/E43/E42/E41
Tree: G29/YG63/YG03

--------------------------

Card Recipe for My Season to be
Freezin’ Card

Yeti with Tree, Paper Nest Dolls
Paper Basics - Stamper's Select White Cardstock, Papertrey Ink
Winter Wonderland 6” x 6” Paper Pad, Doodlebug Designs Inc.
Winter Wonderland Chit Chat, Doodlebug Designs Inc.
Slimline Stitched Hillside Border Dies, Lawn Fawn
Woodland Collection Birch Tree Forest, Sue Wilson
Wooden Snowflake Embellishments, Stampin’ Up!
Shaded Spruce Card Stock, Stampin’ Up!

Finished card size: 5 ½” x 4 ¼”

Stamp Size: 3”

--------------------------

Hope you like my Season to be Freezin’ Card using
Yeti with Tree by Paper Nest Dolls!

Thank you for stopping by!

Hugs,
Laurie

Friday, January 6, 2023

Wintertime Wishes Card


Hello Crafty Friends! It's Laurie here! I am sharing my Wintertime Wishes Card as my Design Team Inspiration Card for Paper Nest Dolls using the sweet Emma with Snowflake Banner. Don’t you love her beautiful snowflake banner!

The Details of My Card

For my card, I coloured Emma with my Copic markers in one of my favourite colour combos of pinks, blues, and tans! I added Glossy Accents to the hearts on her snowflake banner and Stardust Stickles to her hat pompom, bows and the snowflakes.

The Snowed In Paper was perfect for my card since the knitted snowflake pattern created a cozy warm feel and suited my snowflake theme. Even the “Wintertime” sentiment was from the Paper Pad.

I had the Frostyville Corner Die from Memory Box in my stash and thought it would work for a mini slimline card. I love how it peeks put from under the sentiment creating interest over the knitted snowflake paper! A few more glimmery snowflakes from punches and a die were added for sparkle. To ground Emma, I added a stitched snowbank and ran some Glittered Organdy Ribbon over it to add more sparkle. I also added the ribbon across the top of the so that the sentiment hangs from it.

The finishing touch was a scattering of rhinestones on the knitted paper to add even more sparkle!

--------------------------

Copic Markers:

Skin: E000/E00/E21/E11/E04/R20
Hair: E99/YR24/YR23
Blues: B91/B93/B95/B97
Browns: E41/E42/E43/E44
Pinks: R81/R83/R85


Card Recipe for Wintertime Wishes Card:

Emma with Snowflake Banner, Paper Nest Dolls
Paper Basics - Stamper's Select White Cardstock, Papertrey Ink
Snowed In 6” x 6” Paper Pad, Echo Park
White Glimmer Paper, Stampin’ Up!
Slimline Stitched Hillside Border Dies, Lawn Fawn
Frostyville Corner Die, Memory Box
Seasonal Layers Thinlits Dies, Stampin’ Up!
Snowflake Border Punch, Martha Stewart
Snowflake Corner Punch, Martha Stewart
Glittered Organdy Ribbon, Stampin’ Up!
Rhinestone Basic Jewels, Stampin’ Up!
Glossy Accents, Ranger
Star Dust Stickles, Ranger
Basic White, Rococo Rose, and Crumb Cake Card Stock, Stampin’ Up!

Finished card size: 6 ½” x 3 ½”

Stamp Size: 4 ½” Tall

--------------------------

Hope you like my Design Team card for Paper Nest Dolls!

Thank you for stopping by!

Hugs,
Laurie


Tuesday, November 29, 2022

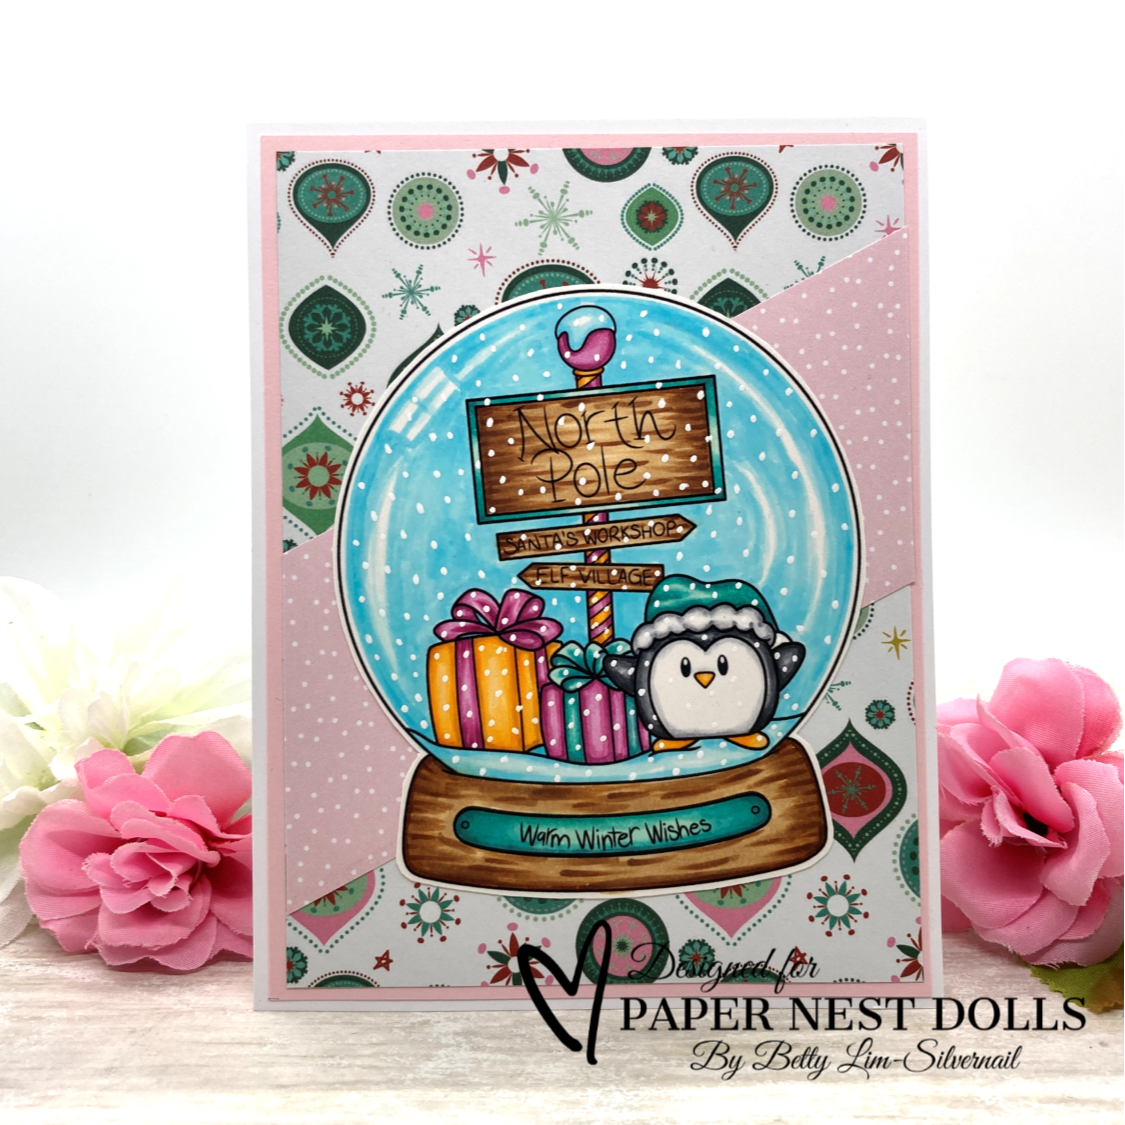
Snow Globe Bundle: Warm Winter Wishes

Hello Paper Nest Dolls fans! Betty here on the blog. Ever since I was a kid, I've always loved snow globes. They are just fun to shake and so pretty to watch as the snow comes down. I just love the stamps from the Snow Globe Bundle by Paper Nest Dolls. This bundle comes with 10 stamps that include images and sentiments, all for $10 for a limited time!


To make this A2 top folding card, I first printed the stamp at 3-1/4"W x 3-3/4"H and colored it with Copic markers. I then fussy cut the image leaving a small white border.

Copic Markers used:
Penguin
Black: N9, N5, N3, N1
White: N4, N1, 0
Yellow: Y38, Y35, Y32
Blue Green: BG18, BG15, BG13,BG10
Pink: RV66, RV55, RV63
Brown: E37, E35, E31
snow & Snow globe glass (blue): B01, B00, B000


The patterned papers I used are from Carta Bella and Photoplay. They were perfect for a wintery card. 

I hope you give this snow globe card a try! Digital stamps are so easy to work with and you can make them any size you want. 


Thank you for visiting today. Have a creative week!

Tuesday, November 22, 2022

My Fa La La Card

My Fa La La Card


Hello Crafty Friends! It’s Laurie here! I am sharing My Fa La La Card as my Design Team Inspiration Card for Paper Nest Dolls using Snow Globe Bundle. This Bundle includes a clear snow globe with a selection of images and labels for the holiday season. I love the versatility of this bundle since you can interchange the images in the globe or use the images by themselves.

The Details of My Card


For my card, I decided to use the singing snow people without the globe. They are just too cute, and I had the perfect Fa La La die for them. In fact, I had two Fa La La dies. Lol! The cover plate behind them and the red glimmer falala.

I pulled the colours of the DSP to colour my snow people in a red and a blue/green. I used my favourite technique for their snow bodies where I use two light makers along the edges and then use my colourless blender to soften the transition between the colour and the paper. The same technique was used for their song books.

Since these cuties are singing, I had to add some musical notes floating up from them! Some glimmery snowflakes and snowbank add even more sparkle to my card. The finishing touch was Star Dust Stickles on their hat trim and the hearts.

————————–

Copic Markers:


Reds: R29/R24/R24/R22
Blue/Greens: BG09/BG57/BG53
Whites: BG0000/BG000/0
Carrots: YR12/Y38/YR12
Song Books: E42/E40/0


————————–

Card Recipe for My Fa La La Card:


Snow Globe Bundle, Paper Nest Dolls
Paper Basics – Stamper’s Select White Cardstock, Papertrey Ink
Santa Express Design Series Paper, Stampin’ Up!
Real Red & White Glimmer Paper, Stampin’ Up!
Slimline Stitched Hillside Borders, Lawn Fawn
Frosted Flurries Dies, Stampin’ Up!
Fa La La Cover Die, The Stamp Market
Music Notes Die, From my Stash
Star Dust Stickles, Ranger
Basic White, Bermuda Bay and Petal Pink Card Stock, Stampin’ Up!

Finished card size: 5 ½” x 4 ¼”
Stamp Size: 3” Tall

————————–

Hope you like my Design Team card for Paper Nest Dolls!

Thank you for stopping by!

Hugs,
Laurie

Thursday, December 2, 2021

Eskimo Ellie by Noelene


Hello everyone Noelene back today with another new release, this time from the Paper Nest Dolls.


For my card I am using one of the new December release images called Eskimo Ellie.


Copic Markers:
Clothes: B63, B66, B69, V12, V15, V17
Fur & Seal: T0, T1, T2, T3, T4
Hair: E42, E43, E44, E49
Skin: E0000, E000, E00, E11, R20


Eskimo Ellie is available in digital stamp here.


Thanks for stopping by!

Hugs

Noelene x


Sunday, December 27, 2020

Avery with Snowman

Hello crafty friends!  It's Amanda Fitterer here!  I hope your Christmas was amazing!  I can't believe it's over already!  I can't believe that 2020 is almost over!  Craaaazy!  I hope you're all staying healthy and warm!

Today, I'm sharing this card using the Avery with Snowman stamp.


To make this card, I started with printing the digital stamp onto 80# Neenah Solar White cardstock.  I colored the image using Copic markers and then cut the image using scissors.


Next, I made my card base and embellishments using scrapbook paper.  I used 3D foam squares and strips to adhere them to my card front.


Isn't she just SO sweet with her little snowman?  Thank you so much for stopping by the Paper Nest Dolls blog today!  I hope you have a wonderful New Year!  See ya back here in 2021!!

Xoxo, Amanda
copyright © 2013 the paper nest · graphics by erica belton · web design by red peach designs