Showing posts with label Gnome Set. Show all posts

Friday, April 28, 2023

Bunches of Wishes Card


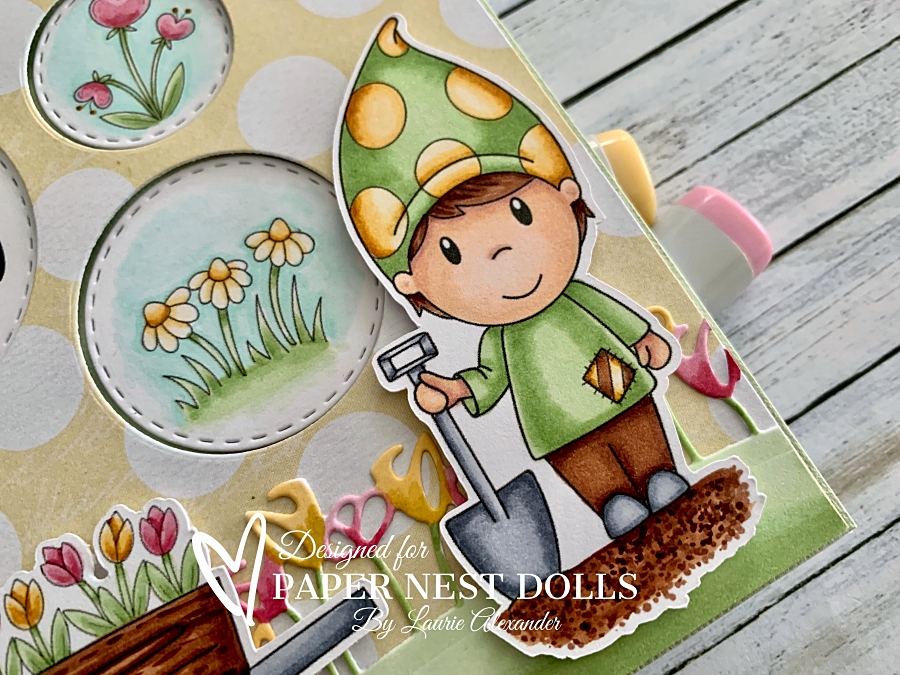
Hello Crafty Friends! It's Laurie here! I am sharing my Bunches of Wishes Card that was published in the March Issue (#242) of the Simply Cards and Papercraft Magazine. I was honoured when Christine Young, owner of Paper Nest Dolls, asked me to create a card to be published using Shovel Gnome from the Gnome Set. There are ten images in the set including:

The Details of My Card

For my card, the Magazine had specified pastel colours with a Spring theme. So, I used The Four Seasons Spring, P13 paper for my card. I coloured my images with my Copic markers to match my paper. 

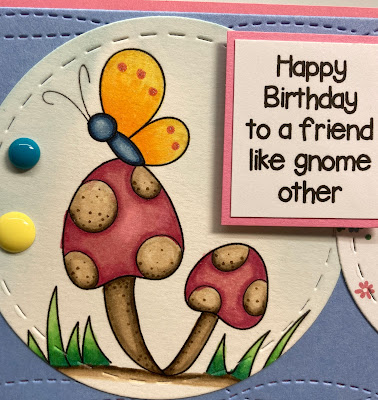
I love how the circles on the yellow paper match the circles in my design with the different flowers from the set and the sentiment! So many choices for him to think about planting! Lol!

Tip: Place all three circle dies on paper where you want them. Using a Post-it Note secure them to paper to keep position and run through die cutting machine all at the same time.

One thing that is so great about digital stamps is that I was able to add flowers to the wheelbarrow! Since I added tulips in it, I added a die cut tulip boarder behind him that I coloured to match my scene.

The sentiment was printed out on my computer and die cut out. It and the other circles were slid into place using liquid adhesive. 

The birds and butterfly added interest to my scene.

Clear Wink of Stella was added to the wings of the butterfly to add some sparkle.

--------------------------

Copic Markers

Shovel Gnome
Skin: E15/E13/E11/E00/E000/R20
Hair: E29/E27/E25/E23
Greens: G82/G43/G40 
Yellows: YR24/YR31/YR30 
Browns: E29/E27/E25E/23
Shovel/Shoes: C5/C3/C2


Tulips
Pinks: R85/R83/R81
Yellows: YR24/YR31/YR30
Greens: G82/G43/G40

Wheelbarrow
Wood: E29/E27/E25/E23
Wheel/Handle: C5/C3/C2

Birds
Blues: BG11/BG10
Beaks: YR24

Butterfly
Body: C5/C3/C2
Wings: BG11/BG10


Flowers/Tulip Border Die Cut
Pinks: R85/R83/R81
Yellows: YR24/YR31/YR30
Greens: G82/G43/G40

Sky
BG11/BG10/0

--------------------------

Card Recipe for My Bunches of Wishes Card

Gnome Set, Paper Nest Dolls
Paper Basics - Stamper's Select White Cardstock, Papertrey Ink
The Four Seasons Spring, P13
Aloe Vera Card Stock, Bazzill
Stitched Layering Circle Dies, Memory Box
Tulip Dies, Stampin’ Up!
Spring Gnome Sentiments, Polkadoodles Stamps & Papercrafting
Electronic die cutting machine and scissors
Manual die cutting machine
Clear Wink of Stella, Stampin’ Up!
Tombow Liquid Glue

Finished card size: 5” x 5”

Stamp Size: 3”

--------------------------

Hope you like my Design Team Inspiration Card using
Wheelbarrow Gnome from the Gnome Set by Paper Nest Dolls!

Thank you for stopping by!

Hugs,
Laurie


Thursday, April 27, 2023

Blooming Wishes Birthday Card


Hello Crafty Friends! It’s Laurie here! I am sharing my Blooming Wishes Birthday Card that was published in the March Issue (#242) of the Simply Cards and Papercraft Magazine. I was honoured when Christine Young, owner of Paper Nest Dolls, asked me to create a card to be published using Watering Can Gnome from the Gnome Set. There are ten images in the set including:
  • Shears Gnome
  • Tulip Gnome
  • Shovel Gnome
  • Watering Can Gnome
  • Bird Bath
  • Tulips
  • Daises
  • Mushroom with Butterfly
  • Wheelbarrow Gnome
  • Gnome Home


The Details of My Card


For my card, the Magazine had specified pastel colours with a Spring theme. So, I used The Four Seasons Spring, P13 paper for my card. I coloured my images with my Copic markers to match my paper.

To build my card, I used the largest mini slimline scallop die to create a banner behind my focal point. I trimmed it down to fit my card. Next, I added a banner along the top to finish off the top.

Tip: Use mini slimline dies for different sized cards by trimming down to fit project.

I thought that the watering can die would be fun way to anchor my watering can gnome. Accordingly, I die cut the watering can twice, once in pink and once in yellow. Then, I trimmed the top and bottom of the yellow watering can and adhered to the pink to give the watering can a two tone look.

Once that was done, I layered the watering can with a sun and cloud from my favourite die set. I added the tulips along the bottom of the watering can and added one of the birds from the Bird Bath Stamp.

Tip: Use parts of digital stamps, like the birds from the birdbath, instead of the whole stamp to create interest.

The sentiment was printed out on my computer and slid behind the watering can gnome’s head almost like she is wishing the recipient a blooming birthday!

The other bird and butterfly were added to the music paper on the card base.

Clear Wink of Stella was added to the wings of the butterflies and Glossy Accents to her watering can A scattering of rhinestones that were coloured with my Copic markers were added to give sparkle.

————————–


Copic Markers


Watering Can Gnome
Skin: E15/E13/E11/E00/E000/R20
Hair: E25/YR24/Y26/Y21
Pinks: R85/R83/R81
Greens: G82/G43/G40
Yellows: YR24/YR31/YR30
Flower Petals: YR31/YR30
Flower Centre: YR24/YR31
Watering Can: C5/C3/C2


Tulips
Pinks: R85/R83/R81
Yellows: YR24/YR31/YR30
Greens: G82/G43/G40

Birds
Yellows: YR24/YR31/YR30
Beaks: YR24


Butterfly
Body: C5/C3/C2
Wings: BG11/BG10


Rhinestones: R85/G82

————————–

Card Recipe for My Blooming Wishes Birthday Card


Gnome Set, Paper Nest Dolls
Paper Basics – Stamper’s Select White Cardstock, Papertrey Ink
The Four Seasons Spring, P13
Chiffon Card Stock, Bazzill
Romance Card Stock, Bazzill
Spring Showers Dies, Lawn Fawn
Shaped Card-Watering Can Dies, Creative Expressions by Sue Wilson
Petite Scallop Mini Slim Stacklets, Taylored Expressions
Gnome Men Sentiments, Polkadoodles Stamps & Papercrafting
Clear Wink of Stella, Stampin’ Up!
Glossy Accents, Ranger
Basic Rhinestone Basic Jewels, Stampin’ Up!

Finished card size: 5” x 5”

Stamp Size: 3”

————————–

Hope you like my Design Team Inspiration Card using
Watering Can Gnome from the Gnome Set by Paper Nest Dolls!

Thank you for stopping by!

Hugs,
Laurie

Monday, March 20, 2023

Hello Springtime!


Hello Crafty Friends! Welcome Spring! It’s Laurie here! I am sharing Hello Springtime! as my Design Team Inspiration Card for Paper Nest Dolls using Watering Can Gnome from the Gnome Set. There are ten images in the set including:

  • Shears Gnome
  • Tulip Gnome
  • Shovel Gnome
  • Watering Can Gnome
  • Bird Bath
  • Tulips
  • Daises
  • Mushroom with Butterfly
  • Wheelbarrow
  • Gnome Home

Since today is the First Day of Spring, I thought I would create a Spring card with tulips blooming, birds singing and butterflies fluttering! For my card, I decided to create a scene using several stamps from the Gnome Set.
 

The Details of My Card


I used Microsoft Word to layout my carefully planned scene so that when I added the Watering Can Gnome, she wouldn’t block any of the other images. I printed and coloured her with my Copic markers separately so that I could add some depth to my scene.

Once everything was coloured, I used the different sizes of the Blending Brushes by Picket Fence and a Kraftin’ Kimmie Stamps cloud stencil to create my sky around the coloured images. It’s nice that the blending brushes come in different sizes! The smaller ones allowed me to get into areas close to the coloured images without having to mask them.

Tip: Use parts of digital stamps, like the birds from the birdbath, instead of the whole stamp to create interest.

For the grass, I wanted a straight part where the flowers were and then a hill to add interest. So, for the straight piece, I used the largest Small Mini Slimline Stackables Die to get the stitching along the top. The hill was from the Slimline Stitched Hillside Border Dies by Lawn Fawn. To create dimension and differentiate the two pieces of grass, I used dimensionals.

Tip: use your slimline dies for more than just slimline cards.

I tucked my coloured gnome into the hill part of the grass but added dimensionals behind her to give depth to my scene.

I added die cut stitched clouds to match the stitching on the grass. The sentiment was printed out on my computer and them die cut with another stitched die.

Clear Wink of Stella was added to the wings of the butterflies and Glossy Accents to her watering can. A scattering of yellow resin flowers in the grass added to my Spring theme.

————————–


Copic Markers


Girl Gnome
Skin: E15/E13/E11/E00/E000/R20
Hair: E25/YR24/Y26/Y21
Pink: R85/R83/R81
Green: G82/G43/G40
Yellow: YR24/YR31/YR30
Flower Petals: YR31/YR30
Flower Centre: YR24/YR31
Watering Can: C5/C3/C2


Tulips
Pink: R85/R83/R81
Yellow: YR24/YR31/YR30
Green: G82/G43/G40

Birds
Yellow: YR24/YR31/YR30
Beak: YR24

Butterflies
Body: C5/C3/C2
Wings: BG11/BG10

Mushrooms
Pink: R85/R83/R81
Yellow: YR24/YR31/YR30
Stems: E25/YR24

————————–


Card Recipe for My Hello Springtime! Card


Gnome Set, Paper Nest Dolls
Paper Basics – Stamper’s Select White Cardstock, Papertrey Ink
The Four Seasons Spring Paper Pad, P13
Aloe Vera Card Stock, Bazzill
Romance Card Stock, Bazzill
Turquoise Mist Card Stock, Bazzill
Spring Showers Dies, Lawn Fawn
Slimline Stitched Hillside Border Dies, Lawn Fawn
Small Mini Slimline Stackables, Lawn Fawn
Spring Gnome Sentiments, Polkadoodles Stamps & Papercrafting
Pretty Pillowbox Dies, Stampin’ Up!
Krafty Scenery 2 Stencil, Kraftin’ Kimmie Stamps
Salty Ocean Distressed Inks, Ranger
Blending Brushes, Picket Fence
Fun Flowers Resin Shapes, Stampin’ Up!
Electronic die cutting machine and scissors
Clear Wink of Stella, Stampin’ Up!
Glossy Accents, Ranger

Finished card size: 5” x 5”

Stamp Size: 3”

————————–

Hope you like my Design Team Inspiration Card using
Watering Can Gnome from the Gnome Set by Paper Nest Dolls!

Thank you for stopping by!

Hugs,
Laurie

Saturday, February 26, 2022

Happy Birthday to a Friend Like GNOME Other

Hello PND Fans! Betty here today with a slimline card featuring stamps from the fabulous Gnome Set. This set includes 4 gnomes, a gnome house, and 5 stamps to build a scene. Such a fun set for making some fun projects. I made this slimline birthday card using two of the gnomes and the mushroom-butterfly stamp.


First I printed the digital stamps 3" tall. I colored them with Copic markers then fussy cut the gnomes and used a 3" stitched circle die to cut the mushroom-butterfly.


Copic markers used:
Girl Gnome:
Skin: E04, E11, E21, E00, E000
Hair: E39, YR24, YR23, YR20
Blue: B97, B95, B93, B91
Pink: RV34, RV32, RV00
Green: G16, G14, YG11
Yellow: Y38, Y17, Y15
Brown: E44, E43, E42, E41


Boy Gnome:
Skin: E04, E11, E21, E00, E000
Hair: T9, T5, T3
Yellow: Y38, Y17, Y15, Y13
Blue: B97, B95, B93, B91
Green: G16, G14, YG11
Silver: C5, C3, C1
Brown: E44, E43, E42, E41


Mushrooms:
Brown: E44, E43, E42, E41
Pink: RV34, RV32, RV00
Green: G16, G14, YG11
Yellow: Y38, Y17, Y15, Y13
Blue: B97, B95, B93, B91

I used a 2-1/2" stitched circle die to cut the patterned paper. The paper is from Photoplay. I used an 8" x 3-1/8" wacky slimline stitched die to cut the card front and mounted it onto pink cardstock with an 1/8" border then mounted this onto a slimline card base of white cardstock. 

I created the sentiment on my computer using MS-Publisher, printed, and trimmed it then added a pink mat. I adhered the circles using liquid glue then adhered the two gnomes using double-sided adhesive foam tape. 


Thank you for stopping by today! These cute stamps are fun and easy to color. Perfect cards, scrapbooks, gift tags, treat boxes, and more! Hope you give it a try. 

Have a wonderful day! ~Betty~

Saturday, August 8, 2020

A Friend Like Gnome One Else!


Hi everyone!
I hope you are having a fabulous day!

Stacey here with you today to share a fun card that I created using the 


I have a soft spot for Gnomes, especially super cute ones so I of course was itching to print out some images from the Gnome Set by Paper Nest Dolls and make a card. I printed that fun mushroom house and that sweet little girl onto some white digital cardstock and colored them in with my Copics. Once I had my images colored in, I used my Scan N Cut to cut them out. I die cut a white Scallop rectangle and did a bit of light blue coloring to create my sky, staying inside the stitched lines to give the appearance of a white scallop frame. I added some green cardstock to act as my grass and then added my mushroom house and Gnome. I added some red crochet thread to the top, tying it off into a bow before adding my image panel onto my card base. I completed my card by adding some white doodles, some glossy accents on the door knob and my greeting along the bottom.


I'm so happy with how this card turned out! I think it is just so fun!

Paper Nest Dolls Products used

You can check out the Paper Nest Digital Stamp store by clicking HERE
You can check out the Paper Nest Dolls Rubber Stamp Store by clicking HERE

Copic Markers Used:
Skin: E50, E51, E21, R20, R00
Clothes: B41, B45
Hair: E23, E25
House: E000, E40, E41, E43, E44, R14, R17, R24, W0
Flowers: YG05, YG07, Y11, Y13, Y15, E97, E99
Sky: BG000, BG0000

Thank you so much for stopping by today! 
I hope you have a great crafty day!

Crafty Hugs,
copyright © 2013 the paper nest · graphics by erica belton · web design by red peach designs