Showing posts with label Doll Detectives. Show all posts

Tuesday, August 16, 2022

My Doll Detectives’ Slimline Box Card

My Doll Detectives’ Slimline Box Card

Zoinks! Hello Crafty Friends! It’s Laurie here! I am sharing My Doll Detectives’ Slimline Box Card using Doll Detectives by Paper Nest Dolls for my Design Team Inspiration Card. This bundle comes with 6 digital stamps including 2 boys, 2 girls, a dog, and a van.

The Details of My Card


I had so much fun colouring these cuties with my Copic markers that I made another card with them, but a slimline box card instead! I will add a link to the other card I made at the end of this post.

For my card, I thought a torture scene would be perfect for them using Enchanted Kingdom and Enchanted Forest Slimline Paper by Whimsy Stamps. This paper makes creating scenes so easy because it’s so detailed. Since the paper is so amazing, I decided to use the whole sheet, even though my card would be larger than a usual slimline.


To create my scene, I decided to a box card would be fun allowing for 3 different layers on the front and another one for the back of the card. For each layer, I sponged a stencil to create the cobbled floor and road.


For my sentiments, I thought speech bubbles with their iconic sayings would be such fun! So, I created them in Microsoft Word and used my Brother Scan & Cut to cut them out. For Jinkies and Jeepers, I wanted them to hover above the girls’ heads. Hence, I used a thin strip of window sheet for each and glued them to the layer behind them. I will include a link to a PDF of the sentiments that I created that you could download at the end.

The only embellishment that I added was the cute magnifying glass beside the main sentiment. Tip: use Glossy Accents to glue it to the card. I found it worked the best.

————————–

Copic Markers:


Girl 1
Skin: E000/E00/E21/E11/E04/R20
Hair: E57/E37/E08/E15/YR27
Shirt: YR68/YR65/YR61
Skirt: E37/E08/E15
Magnifier: W4/0
Glossy Accents on Glasses and Magnifier


Boy 1
Skin: E000/E00/E21/E11/E04
Hair: E57/E25/E99/YR27/YR24
Shirt: G07/YG09/YG05
Pants: E37/E08/E15
Shoes: W8/W6/W4
Sandwich: E50/E51/YG03/Y17/YR24/R08


Dog
Fur: E27/E25/E23
Collar: B18/B26/B24/B12
Tongue/Ears: RV00/R20
Nose/Spots/Eyebrows: W8/W6
Dog Tag: C3/C1

Boy 2
Skin: E000/E00/E21/E11/E04
Hair: YR24/Y35/Y13/Y11/Y00
Sweater: C3/C1/C0/0
Pants: B18/B26/B24/B12
Scarf: YR09/YR16/Y17
Shoes: E50/E53/E55


Girl 2
Skin: E000/E00/E21/E11/E04/R20
Hair: E08/YR18/YR07/YR04/Y17
Scarf: G07/YG09/YG05
Dress/Shoes/Headband: BV04/BV02/BV00
Stripes/Tights: V12/V01/RV00

Van
Green: G07/YG09/YG05
Blue: BG57/BG45/BG53
Wheels: C9/C7/C5
Steel Parts: C5/C4/C3
Flowers: YR09/YR16/Y17


————————–

Card Recipe for My Doll Detectives’ Slimline Box Card:


Doll Detectives, Paper Nest Dolls
Paper Basics – Stamper’s Select White Cardstock, Papertrey Ink
Enchanted Kingdom Slimline Paper Pack, Whimsy Stamps
Enchanted Forest Slimline Paper Pack, Whimsy Stamps
Window Sheet, Stampin’ Up!
Microsoft Word for sentiments
Brother Scan & Cut
Rocky Road Stencil, Kraftin’ Kimmie Stamps
Blending Brush, Stampin’ Up!
Basic Gray Ink Pad, Stampin’ Up!
Glossy Accents, Ranger
Tranquil tide, Basic Black, and Basic Gray Card Stock, Stampin’ Up!

Finished card size: 8 6/8” x 3 6/8”


————————–

To download a PDF of my Doll Detectives’ sentiments, please click here.

Here is the other Doll Detective card that I made. Please click here to find out more about this card.


Hope you like my Design Team Inspiration Card using Doll Detectives by Paper Nest Dolls!

Thank you for stopping by!

Hugs,
Laurie

Wednesday, December 29, 2021

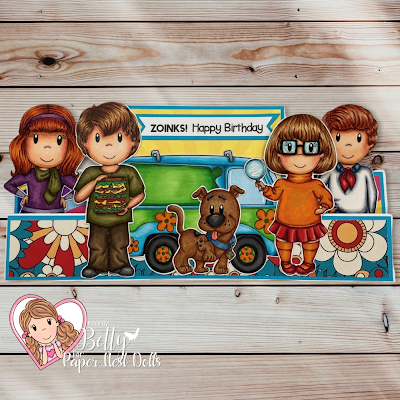
ZOINKS! Happy Birthday

Hi PND Fans! It's Betty here...My all time favorite cartoon growing up was a group of kids and their Great Dane dog, so when Paper Nest Dolls came out with this set of stamps, called Doll Detectives, I couldn't just color just one of the stamps, I had to color them all! This awesome stamp bundle comes in red rubber and in digital formats! I used the digital formats so that I can make them the size I needed for my slimline easel card.


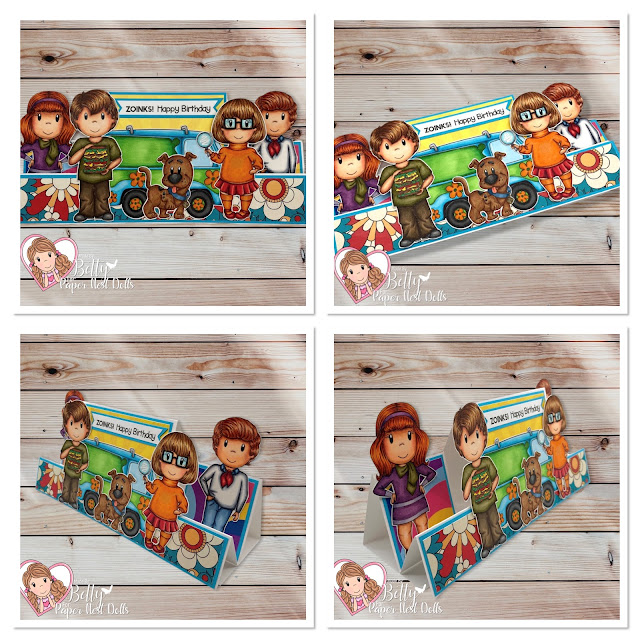
To make this slimline easel card, I first printed the two girls and the two boys at 3-3/4" tall. The dog is 2" tall and the bus is 2-3/4" tall. I colored all the images with Copic markers and the sandwich with Prismacolor pencils then fussy cut them.


Copic Markers Used
Girl 1
Skin: E13, E11, E21, E00, E000
Cheeks: R20
Hair: E18, E08,YR18, YR14
Green: YG97, YG95, YG93, YG91
Light Purple: V25, V22, V20
Dark Purple: V17, V15, V12

Girl 2
Skin: E04, E11, E21, E00, E000
Cheeks: R20
Glasses: B00
Hair: E29, E37, E35, E34, E31
Orange: YR18, YR16, YR14, YR12
Red: R39, R37, R35, R32
Magnifying Glass: C5, C3, C1, B01, B000

Boy 1
Skin: E04, E11, E21, E00, E000
Cheeks: R20
Hair: E13, E11, E53, E50
White: C7, C5, C3, C1, 0
Blue: B99, B97, B93, B91
Red: R39, R37, R35, R32
Shoes: E47, E44, E43

Boy 2
Skin: E04, E11, E21, E00, E000
Cheeks: R20
Hair: E29, E37, E35, E34, E31
Green: YG97, YG95, YG93, YG91
Brown: E47, E44, E43, E42
Shoes: T5, T2, T1

Sandwich - Prismacolor Pencils
Brown: PC943, PC946
Green: PC909, PC911
Orange/Yellow: PC916, PC918
Red: PC924

Dog
Brown: E39, E35, E34, E31
Red: R22, R20
Black: T7, T5, T3
Blue: B97, B93, B91
Gold: Y28, YR24

Bus
Blue: BG07, BG05, BG02, BG01, BG000
Green: YG17, YG09, YG07, YG05
Orange: Y18, Y16, Y15
Silver: T3, T2, T0
Black: T9, T7, T5

To make the slimline easel card, use the following measurements as shown below. There are two cut lines and the rest are score lines. I did my measurements and marked it with pencil, then I used a steel ruler and craft knife to make my cut lines. You can also use a rotary or blade paper trimmer that has grid lines and measurements to make your cuts. For this card, start with a sheet of 8-1/2" x 11" cardstock. Cut off 1/2" of the 11" side so that the cardstock measures 8-1/2" x 10-1/2". Make the following cut and score lines:


After making the cut and score lines, fold the easel to look like this: 


I downloaded and printed some free digital patterned paper from Freepik to decorate the card. I thought this flower pattern was perfect for the card. I matted the patterned paper with turquoise cardstock. I used liquid glue to adhere all the images onto the card. I created and printed the sentiment on my printer, then trimmed it. I added a turquoise cardstock mat behind it.
This was such a fun card to make! These stamps are just so cute! Great for scrapbooking too! 

Thank you for stopping by and I hope you have a creative week! 
copyright © 2013 the paper nest · graphics by erica belton · web design by red peach designs