Wednesday, March 30, 2022

Happy Mother's Day Card Using Lulu with Peony

 Hi PND Fans! It's Betty and I am getting a jump start on getting a few Mother's Day cards done. When I saw this beautiful digital stamp from Paper Nest Dolls called Lulu with Peony, I instantly knew it was going to be made into a Mother's Day card. I added some patterned paper, flowers, and a bow to make this beautiful card.


To make this A6 size card, I first printed the digital stamp 3-3/4" tall and colored it with Copic markers.
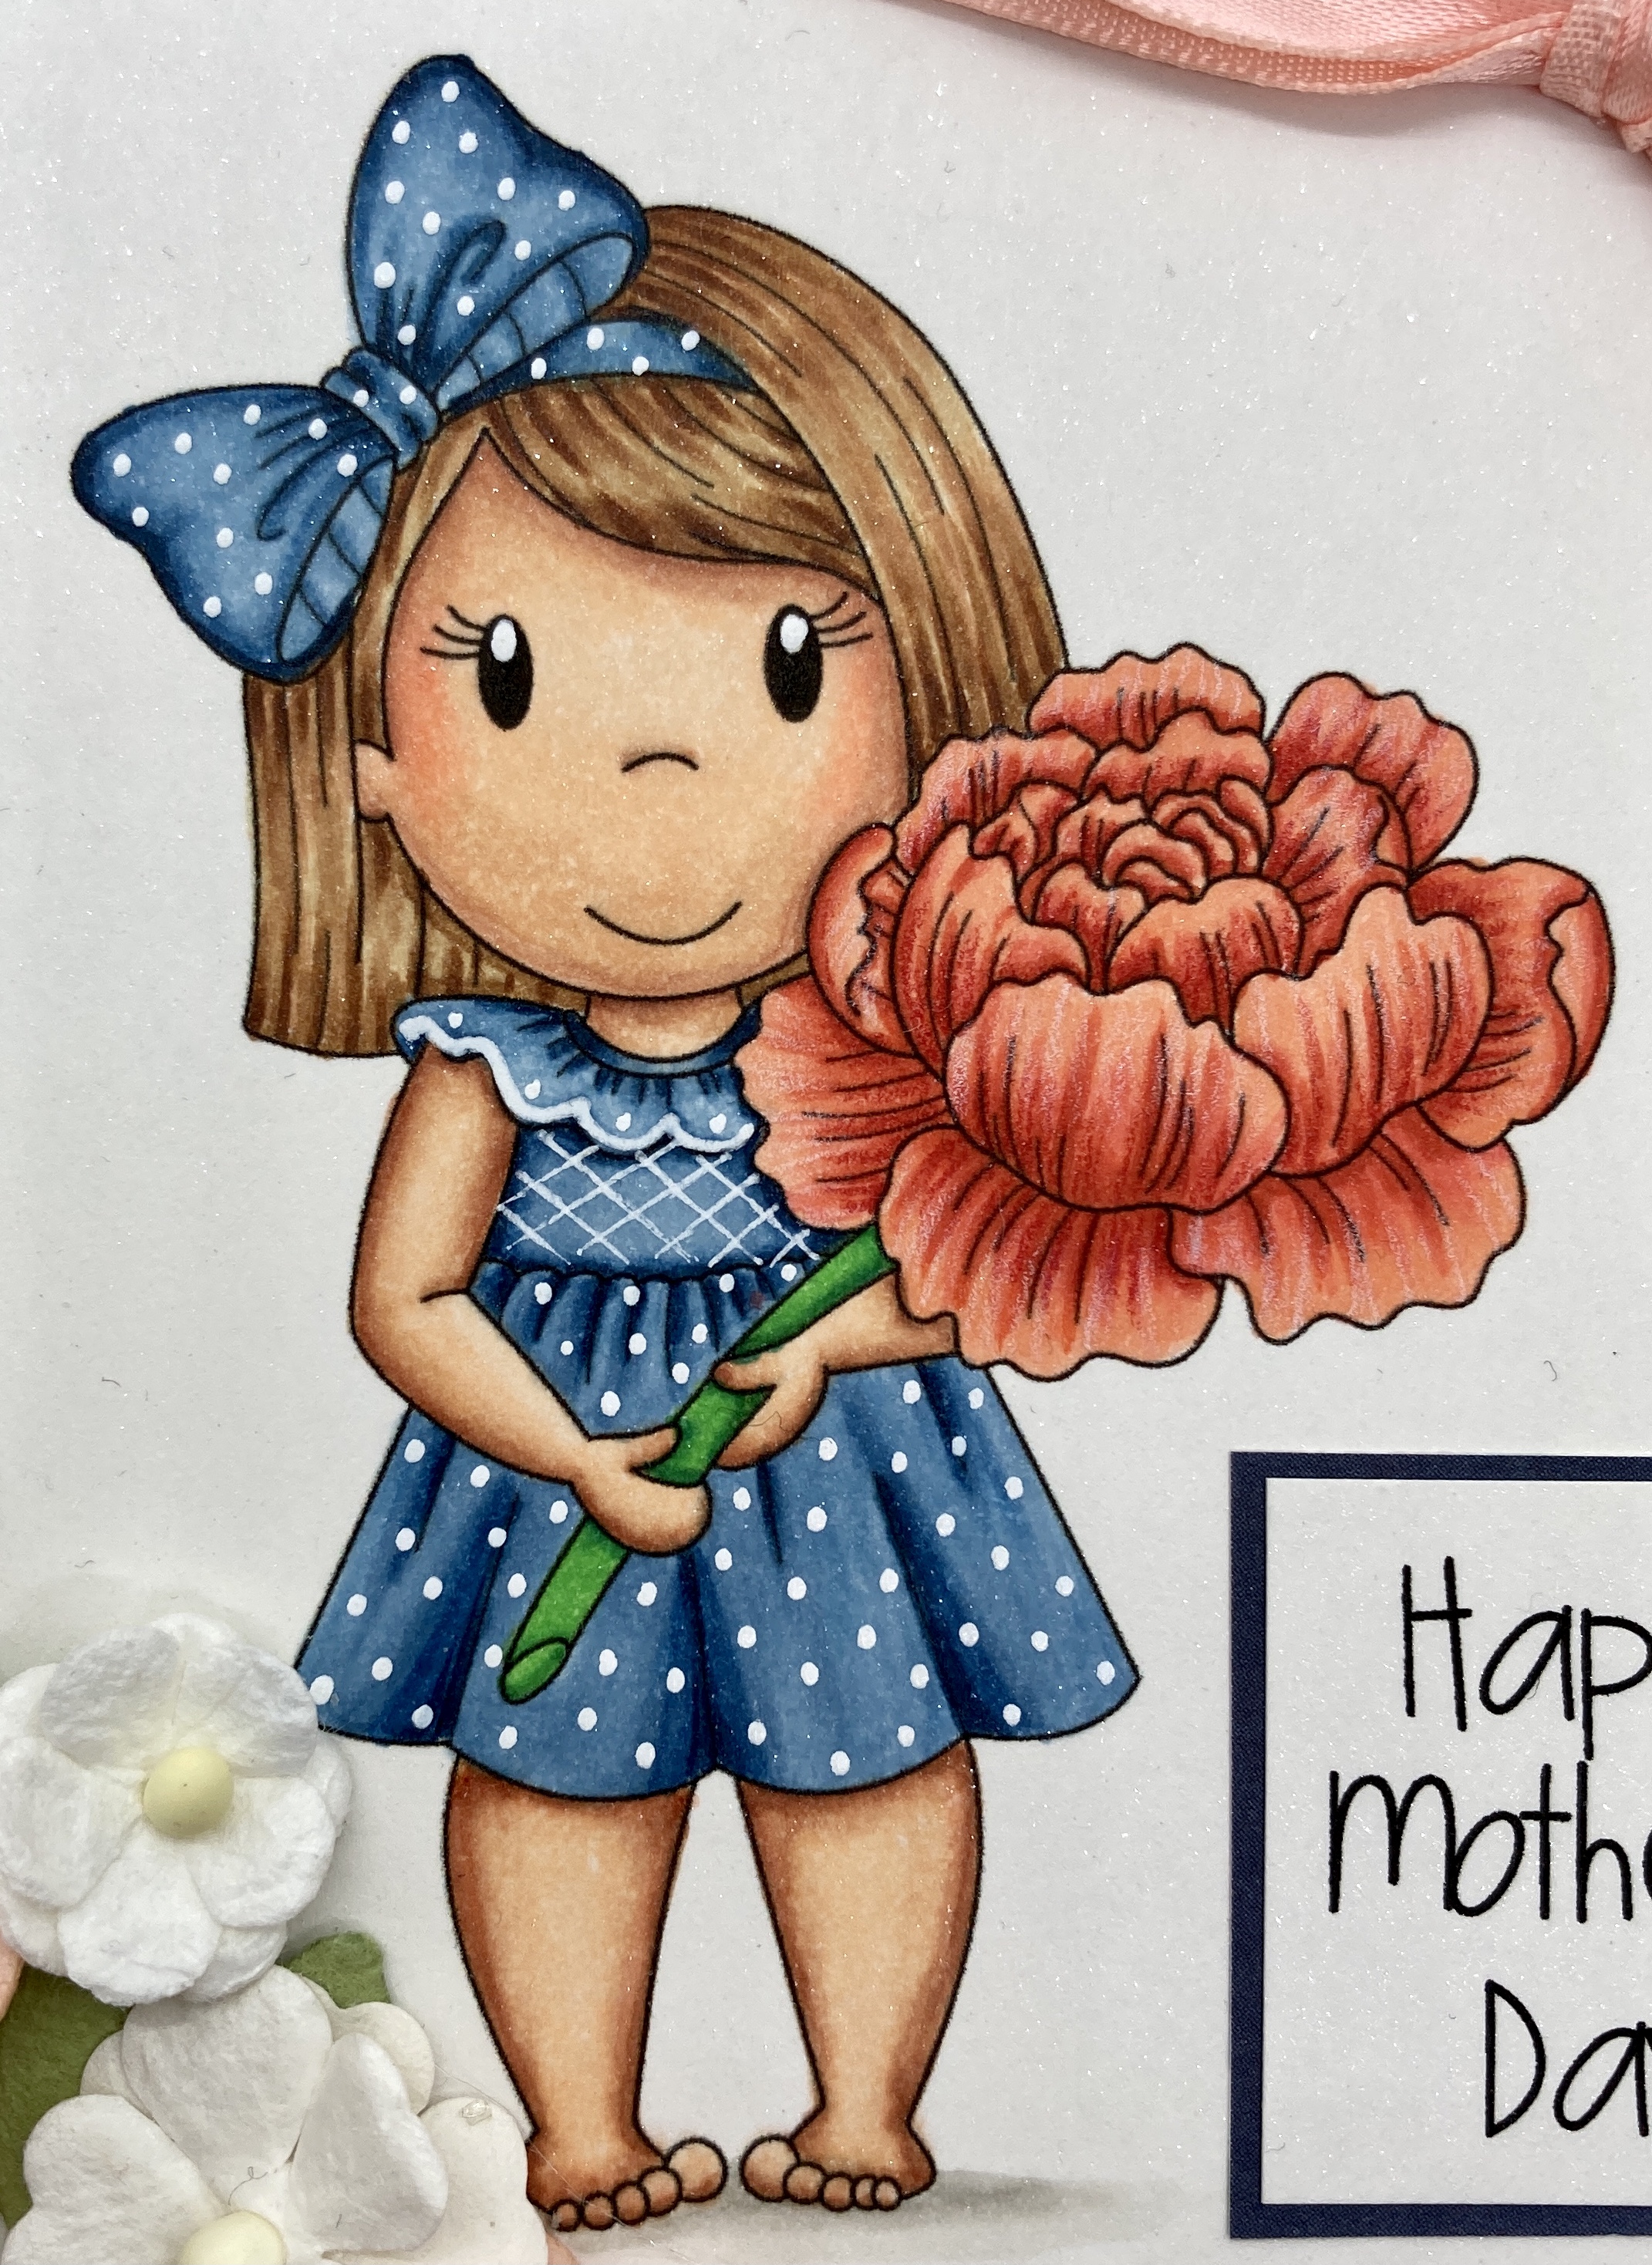

Copic markers used:
Skin: E13, E11, E21, E00, E000
Cheeks: E93
Hair: E37, E35, E33, E31
Blue: B97, B95, B93, B91
Green: G16, YG09, YG06
Orange: R08, R14, R02


I used my paper trimmer to cut the colored stamp rectangular to the size of 3"W x 4"H. I then matted it with a cobalt blue cardstock, leaving 1/8" border. The background orange paper is an older paper from my stash. I also matted it with the cobalt blue cardstock. Before adhering these strips down, I added a strip of satin ribbon. I cut out two strips of patterned paper at 1-1/2"W x 5-1/4"H from the Summertime paper pack from Echo Park. I staggered them and adhered them to the card. I then adhered the colored stamp.


I added some flowers from I Am Roses to the front of the card. I adhered them to the card with hot glue. Next, I created the Happy Mother's Day sentiment on my computer, printed it, trimmed it, and matted it with the cobalt blue cardstock then adhered it to the card. To finish the card, I added a double loop bow to the card. 

Thank you for visiting today and I hope you a wonderful and creative day! ~Betty~

Sunday, March 20, 2022

Little house of Fairies

Hi friends!

Pam here with you today to share a super fun little project I have been working on.

I have been wanting to create a little flip album for quite some time, and these adorable little sweethearts from the Fairy Set were so perfect for this project.  I love all things girly and pink!

My inspiration came from a project I saw online when ordering my paper.  


Once I decided which elements I wanted to use from the Fairy Set, I printed them on X-Press It Blending Card and started coloring.

~Copics~
Skin: E13, E11, E21, E00, E000, E0000, R20, R30, R00
Hair Combinations: 100, E70, E59, E57, E55 / E29, E27, E25, E23, E99 / E55, E53, E51, E50
Teals: BG15, BG13, BG11, BG00
Yellows: YR23, Y15, Y11, Y00
Reds: R08, R05, R14
Oranges: YR18, YR16, YR15, Y18
Wings: BG0000, BG000, RV0000
Purples: V04, V01, V000, RV000
Pinks: RV55, RV02, RV00, RV0000
Grays: W7, W5, W3, W2, W1, W0
Greens: YG17, YG03, YG01, YG00


The pages are shown in the order that I have them in the album.


The mushroom shape was cut out with my Cameo Silhouette. I started with 5 white pages and added the layers to each side of the page. Embellishments were added with various dies I have. Lots of dies that haven't seen love in a long time...lol!


I layered some of the flowers, adding enamel dots in various sizes to the centers of the flowers.


Every smart fairy knows they need a back door...cuz you never know when you need to sneak away...lol!!


Thank you so much for stopping by today!

Until next time - Pam


Saturday, March 19, 2022

When Life Gives You A Rainy Day, Play In The Puddles by Noelene

 Hello crafty friends, Noelene back today to share some inspiration for the Paper Nest Dolls.

For my card today I have chosen the image called "Rainy Day Owen."

He was such a fun & cute image to colour. 


Before I coloured my image with Copics, I firstly used the masking technique & shaded the background with some distress ink. This was a first for me so I will definitely practice more in the future.


Copics:
Skin: E0000, E000, E00, E11, R20
Hair: E41, E43, E44, E47
Clothes & Duck: Y11, Y15, Y19, B12, B14, B16, B18
Boots & Boat: R24, R27, R29
Puddle: B000, B00, B01


For my card I started with a 5x7 base then topped with some pretty yellow gingham paper. I then stuck my coloured image on top using some double sided tape for dimension & embellished with some clear crystals.


Rainy Day Owen is available in digi here

Thanks for stopping by!

Hugs

Noelene x

Tuesday, March 15, 2022

From the Herd Birthday Card

From the Herd Birthday Card

Hello Crafty Friends! It's Laurie here! I am sharing my From the Herd Birthday Card using Down on the Farm by Paper Nest Dolls for my Design Team Inspiration Card. This bundle comes with 15 digital stamps including 5 dolls, horse, cow, pig, ewe, chicken coop, tractor, hay, corn, sunflowers and so many more.

The Details of My Card

For my card, I decided to create a slimline card to fit my characters. So, I used my new Picket Fences Diecutting System with the circle dies since one was a fence and the other was grass. Perfect for my farm card! I die cut the fence out of some paper that looked like wood. I added sky paper behind the cow and horse but added a farmer’s field paper behind the girl and pig. To add to my farm theme, I use some wooden boards paper to create my vignettes of the scenes. I wanted the girl and pig to stand out. So, I placed them in front of everything on the die cut grass that has the stamped sentiment. Don’t you just love the sentiment, “Happy Birthday from the Herd. Lol!

--------------------------

Copic Markers:

Horse
Coat: E37/E35/E33
Mane: E53/E51/E50
Hoofs: C6/C4/C3


Girl Farmer
Skin: E000/E00/E21/E11/E04
Hair: E29/E27/E25/E23
Shirt/Boots: R29/R27/R24/R22
Pants: B26/B23/B12
Hat: E35/E33/E31/R29/R27/R24/R22

Pig
Skin: YR02/YR00/E01/E000
Hoofs: C6/C4/C3


Cow
Hide: C7/C6/C4/C3/C0/0
Hair: C3/C0
Hoofs: C6/C4/C3
Horns: E41/E40/0


--------------------------

Card Recipe for My From the Herd Birthday Card:

Down on the Farm, Paper Nest Dolls
Paper Basics - Stamper's Select White Cardstock, Papertrey Ink
I {Heart} Summer Paper Pad, Simple Stories
Cock-a-doodle-doo! Paper Pad, Kaiser Craft
In Good Taste Designer Series Paper, Stampin’ Up!
Heart & Home Designer Series Paper, Stampin’ Up!
Gingham Garden Designer Series Paper, Stampin’ Up!
Slim Line Diecutting System, Picket Fence Studios
Build a Fairy Garden Die Set, Whimsy Stamps
Windmill Fields Dies, Stampin’ Up!
Tulip Fields Stamp Set, Stampin’ Up!
From the Herd Stamp Set, Stampin’ Up!
VersaFine Black Ink, Tsukineko
Pool Party Classic Ink Pad, Stampin Up!
Old Olive and Basic White Card Stock, Stampin’ Up!

Finished card size: 8.5” x 3.5”

--------------------------

Hope you like my Design Team card using
Down on the Farm by Paper Nest Dolls!

Thank you for stopping by!

Hugs,
Laurie


Sunday, March 13, 2022

Egg Coloring with Lulu

Hi Crafty Friends,
I created this monochrome yellow Easter card using Egg Coloring Lulu from Paper Nest Dolls. The background is stenciled with glitter gel and the fun die cut eggs are from Honey Bee Stamps.

Make Crafty Friends Q & A:
Q: Do you color Easter Eggs?
A: Me? Yes, I usually do it with my Best Buddy Maggie, last year we did Easter egg cookies

Supplies:
Paper Nest Dolls Egg Coloring Lulu
Honey Bee Stamps Decorative Egg Dies
Catherine Pooler Swirl Stencil

Friday, March 11, 2022

Down on the Farm: We HERD it's Your Birthday

Hi PND Fans! It's Betty here! Paper Nest Dolls just released the cutest digital stamp set called Down on the Farm! This set has over 15 stamps; which includes 5 dolls, 4 farm animals, a tractor, a chicken coop, a tractor, some flowers, and more! Many stamps to create lots of cards, scrapbook pages, and party decorations. I created a birthday card using the farmer and the animals and added a custom sentiment. 


To make this A2 card, I first printed the digital stamps the following sizes:
  • Farmer 2-1/2"
  • Cow 1-3/4"
  • Sheep 1"
  • Pig 1"
  • Horse 1-3/4"
I colored the stamps with Copic markers and then fussy cut them out.

Copic markers used:
Farmer:
Skin: E04, E11, E21, E00, E000
Cheeks: R20
Hair: T9, T7, T5, T3
Blue: B95, B93, B91
Yellow: YR24, YR23, YR21, YR20
Brown: E37, E35, E33, E31
Silver: C7, C5, C3

Horse: E37, E35, E33, E31
Pig: E97, E95, E93, E00
Sheep: C7, C5, C3, C1, C00, R32, R30
Cow: C7, C5, C3, C1, C00, R32, R30, R01


For the card front, I created the clouds using a cloud stencil and Distress Oxide Ink in Tumbled Glass. I cut out two layers of grass using grass dies and inked them in Distress Oxide Ink in Mowed Lawn. The sun is a die and inked with Distress Oxide Inks in Squeezed Lemonade and Wild Honey.

I adhered the colored images onto the card front using double-sided adhesive tape. I adhered the sun using liquid glue.


To finish the card, I created a sentiment in Microsoft Word, printed it, trimmed it, and added a mat that I inked in Oxide Inks in Squeezed Lemonade and Wild Honey. I adhered it to the card front with liquid glue and the card was finished.


Thank you for stopping by! I hope you give this cute, fun, and easy card a try. Have a creative week! ~Betty~

Sunday, March 6, 2022

Ellie and Bunny Friend

Hi Crafty Friends,
I am getting ready for Easter with this cutie from Paper Nest Dolls, Ellie and Bunny Friend. I created the background using Newton's Nook Bunny Tail Stencil and embossing paste for the tails.

Make Crafty Friends Q & A:
Q: What do you think Ellie's bunny friend's name should be?
A: Me? Eddie


Supplies:
Paper Nest Dolls Ellie and Bunny Friend
Newton's Nook Bunny Tail Layering Stencils
Lawn Fawn Stitched Scalloped Rectangle Die
Kat Scrappiness Bunny Dies

Saturday, March 5, 2022

Celebrate

Hello everyone!  It's Pam here with you today with a super sweet birthday card featuring the darling image called Party Princess Ellie.  

Birthday's are always so much fun to celebrate, especially birthdays for the little ones. The joy on their sweet little faces from the friends, the cake, and of course all the presents.


I printed this little sweetie on X-Press It Blending Card and colored her with the following markers.

~Copics~
Skin: E11, E21, E00, E000, E0000, R20, R30, R00
Hair: E79, E57, E55, E53
Grays: W3, W1, W0
Purples: V06, V04, V01, V000, V0000, RV63
Greens: YG17, YG03, YG01, YG0000
Yellows: YR23, Y15, Y11, Y00


The dies are from Poppy Stamps and La-La Land Crafts.


Thank you so much for stopping by today!

Until next time - Pam


Thursday, March 3, 2022

My Winter Wonderland Mixed Media Piece

My Winter Wonderland Mixed Media Piece

Hello Crafty Friends! It's Laurie here! I am sharing My Winter Wonderland Mixed Media Piece using Eskimo Ellie by Paper Nest Dolls for my Design Team Inspiration Project. We are still in the depths of winter here is Canada. So, I thought I would make something pretty to brighten the last of the winter days.

The Details of My Project

I decided to create a Mixed Media piece. Something that I haven’t done before but have always wanted to create. So, I pulled out my 8” x 10” Gel Printing Plate, my Distress Paints and brayer and went to town. Once I had paint laid down and before it dried, I stamped several different stamps to add interest to my background piece. I placed my mixed media paper over the gel plate and pulled several prints from it.


Once everything was dried, I added some shimmery embossing paste using a stencil. I then splattered some paint all over with my splatter brush.

I trimmed down my print, framed it with a matching blue card stock and glued it to my painted wooden frame. Then, I added my “snow” and snowflake dies. Next came, the white embossed sentiment which used the same blue card stock as the frame. I fussy cut my Copic coloured images and used a die cut iceberg to help ground them. A scattering of rhinestones added more shimmer to the piece.

--------------------------

Eskimo Ellie

Skin: E04/E11/E21/E00/E000/R20
Hair: C10/C7/C5/C4
Jacket: B97/B95/B93/B91
Trim: E44/E43/E42/E41
Mitts: E44/E43/E42
Boots: C10/C7/C5/C4
Seal: E43/E42/E41


--------------------------

Supplies for My Winter Wonderland Mixed Media Piece:

Eskimo Ellie, Paper Nest Dolls
Paper Basics - Stamper's Select White Cardstock, Papertrey Ink
Mixed Media Paper, Canson
8” x 10” Gel Printing Plate, Gelli Arts
Peacock Feathers Distress Paint, Tim Holtz, Ranger
Seedless Preserves Distress Paint, Tim Holtz, Ranger
Spun Sugar Distress Paint, Tim Holtz, Ranger
Frost White All-Purpose Ink, Tsukineko
Shimmery White Embossing Paste, Stampin’ Up!
Ledger Script CMS241, Tim Holtz Collection, Stampers Anonymous
Distressed Textures Stamp #10105756, BoBunny
Distressed Textures Stamp #10105762, BoBunny
The Right Words DS016, Dylusions
Water Mandala Stencil, Sweet Sentiment
Snowflake Border Die, Frostyville, Memory Box
Polar Bears Dies, Stampin’ Up!
Snowfall Thinlits Dies, Stampin’ Up!
Seasonal Frames Thinlits Dies, Stampin’ Up!
Versamark Ink, Stampin’ Up!
Basics Embossing Powder, Stampin’ Up!
Heat Gun, Stampin’ Up!
Tim Holtz Distress Splatter Brush, Ranger
Splatter Booth
Brayer, Recollections, Michaels Arts & Crafts
Palette Knives, Stampin’ Up!
Paper Snips, Stampin’ Up!
Exacto Knife
6” x 8” Wood Painting Panel, Currys
Rhinestone Basic Jewels, Stampin’ Up!
Misty Moonlight and Basic White Card Stock, Stampin' Up!

Finished piece size: 6” x 8”


Hope you like My Winter Wonderland Mixed Media Piece
using Eskimo Ellie by Paper Nest Dolls!

Thank you for stopping by!

Hugs,
Laurie


Wednesday, March 2, 2022

Thinking of You by Noelene

Hi all, Noelene back today to share some D.T inspiration. 
Did you know the Paper Nest Dolls has an adorable new set called Down on the Farm?

Today I have created a card using one of the images from the set called Sunflowers.


This was a simple card to make. After I coloured my image I used a die to cut the scalloped rectangle frame. I then layered this on a border of vellum & placed onto 2 layers to create my rectangle base. Lastly I added the sentiment & some sprinkles to embellish.


Copics:
Flower Petals: Y15, Y38, E08, E13, E71, E74, E77
Leaves: G07, YG11, YG25


Make sure you check out the rest of the adorable Down on the Farm set, which consists of cute PND farmers, farm animals, a tractor & much more!


Down on the Farm set is available in digi here. Rubber set coming soon!

Thanks for stopping by!

Hugs

Noelene x

copyright © 2013 the paper nest · graphics by erica belton · web design by red peach designs