Saturday, April 30, 2022

Decade Dolls: Have a GROOVY Birthday

Hello PND Fans! Betty here today. What is your favorite decade? My favorite is the 70's, because I love the bright color fashions, the music, the disco! Paper Nest Dolls came out with new stamps called Decade Dolls and the first one I had to color is Disco Amara. Of course, I had to make a disco scene for Amara! There are 10 Decade Dolls that you can find on the Paper Nest Dolls digital store. They are  available in red rubber stamps as well.


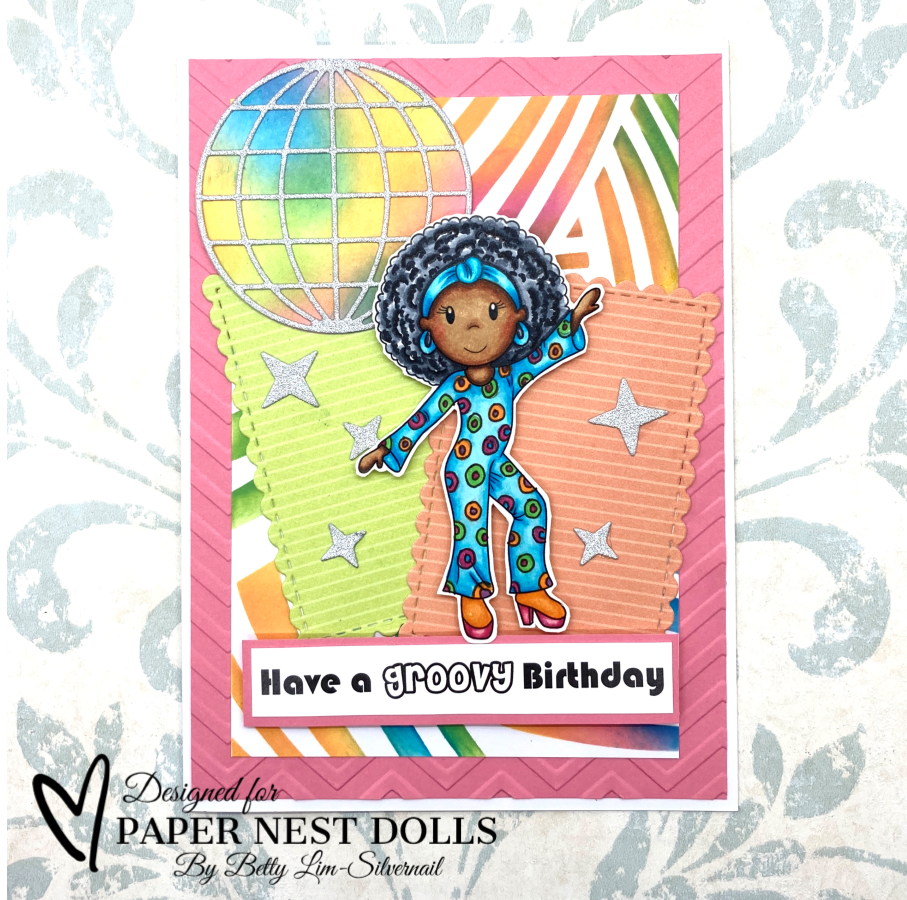
To make this A6 card, I printed the stamp, colored it with Copic markers, then fussy cut her out. I created the sentiment on my computer and printed it at the same time I printed the stamp.

Copic makers used:
Skin: E59, E57, E15, E33, E31
Cheeks: R32
Hair: 100, C9, C7, C5, C3
Dots on dress- Purple: V15, Green: YG07, Pink: RV17, Orange: YR16
Blue: BG04, BG02, BG01, BG000
Shoes: Pink: RV17, RV14, RV11; Orange: YR16, YR14, YR12


Supplies:
-Pink cardstock: Michaels Crafts
-Chevron Embossing folder: Darice
-Geometric Stencil: Amazon
-Distress Oxide: Mermaid Lagoon, Carved Pumpkin, Picked Raspberry, Mowed Lawn
-Patterned paper: Photoplay
-Scalloped Edge Dies: Scrappy Boy Stamps
-Disco Ball & Stars: Stamp Anniething
-Silver glitter cardstock: JoAnn's Crafts

I first created the pink mat layer by embossing it using the chevron embossing folder. Then I created stenciled background by using the Geometric Stencil and Distress Oxide inks. I used a ink blending brush and overlapped some of the colors. I adhered this onto the pink layer. I cut out the patterned papers using the scalloped edge dies and adhered them to the stenciled background.


To create the disco ball, I first inked white cardstock using the Distress Oxide inks, making sure to ink the different colors in different spots. Then I used the disco ball circle to cut it out. I cut out the front part of the disco ball using silver glitter cardstock and adhered it to the inked circle. At this time I cut out the stars and adhered them to the patterned papers along with the disco ball.

I adhered Amara onto the card front using double-sided adhesive foam squares. To finish the card, I matted the sentiment then adhered it using the double-sided adhesive foam squares.


Such a fun stamp to color and card to make! I'll for sure be coloring more Decade Dolls! 

Thank you for stopping by. Have a wonderful and creative day! ~Betty~

Friday, April 29, 2022

Lulu with Sundae by Noelene

Hello everyone, Noelene back today to share some inspiration using a sweet stamp from the Paper Nest Dolls.


Today I am sharing another shabby card that I made a little while back & forgot to share. It was for my SIL's 40th birthday and as you can see I have embellished it with lots of pretty embellishments after roughening the edges of my papers. 


Copic Markers:

Hair: E2, E43, E47
Skin: E0000, E000, E00, E11, R20
Dress: G000, G00, G02
 Bow & Shoes: R81, R83, R85
Sundae: B0000, B000, B00, RV00, RV02, 
RV04, RV34, RV32, E21, E23, E25, 
R32, R35, R39


 Lulu with Sundae can be found in rubber here & in digital format here.


Thanks for stopping by!

Hugs

Noelene x

Thursday, April 28, 2022

Give Peace a Chance

My Make Peace, Not War Card

Hello Crafty Friends! It's Laurie here! I am sharing my Give Peace a Chance as my Design Team Inspiration Card for Paper Nest Dolls using the new release Decade Collection Hippie Ellie. With everything going on in the world right now, I thought this was a very appropriate card for the times!

The Details of My Card

I had a lot of fun colouring Hippie Ellie with my Copic markers! Don’t you just love her jeans with the patches and her suede fringe vest! She is such a groovy hipster!

For my card, I found this perfect paper that had a Seventies theme! I loved it so much that I wanted to use a whole sheet for my card front! So, I used a fun fold called a Z-Fold Card for the card base, but I reversed it into a backwards Z. I wanted the love bug to show on the front with Ellie when the card is closed. This type of card folds up to a regular A2 card but allows for lots of room to decorate! It also is neat how you open it, and the paper continually keeps going!  

Full Card Laid Flat

Since the paper was so detailed, I only used a few dies to dress it up such as the Love, Peace, daisies, and peace sign. They were from the Retro Bus by Elizabeth Craft Designs. I bought this set planning to use them for the Decade Dolls and they were perfect for Hippie Ellie! A couple of sequins and glimmery dots for the flower centres was all the embellishments this card needed.

Measurements

Card Base:  5 ½” x 8 ½”, score at 4 ¼” and 2 1/8”.  Cut the Seventies 6” x 6” paper to 5 ¼” tall, then cut at 2” and 4:”. You could leave the last panel for your sentiment, but I decided to add a fourth panel using a 2” piece of floral rice paper as a background for my coloured stamp.

--------------------------

Copic Markers

Skin: E04/E11/E21/E00/E000/R20
Hair: E39/E37/E35/E33
Jeans: B99/B97/B95/B93/B91
Top: R29/R27/R24/R22
Vest: E29/E27/E25/E23/E21
Shoes: E29/E27/E25/E23
Green: G99/G94/G21
Flowers: R29/R24/R22/Y38

Close Up of Hippie Ellie

--------------------------

Card Recipe for My Give Peace a Chance

Paper Basics - Stamper's Select White Cardstock, Papertrey Ink
Seventies 6” x 6” Paper Pad, Ciao Bella
1928: Retro Bus Dies, Elizabeth Craft Designs
Rice Paper A4 Love Peace Joy, Ciao Bella
Artistry Blooms Adhesive-Backed Sequins, Stampin’ Up!
Glittery Enamel Dots, Stampin’ Up!
Real Red and Basic White Card Stock, Stampin’ Up!

Finished card size: 5 ½” x 4 ¼”

--------------------------

Hope you like my Design Team Inspiration Card using
Decade Collection Hippie Ellie by Paper Nest Dolls!

Thank you for stopping by!

Hugs,
Laurie

Sunday, April 24, 2022

Shall we Dance?

Hello crafty friends!

Pam here with you today with some more inspiration using the color pink...can you tell it's my favorite color?

It's time for school Prom Dances, and this sweetheart is all dressed up and ready to twirl around the dance floor. I miss taking my girls to pick out their dresses!

This darling image from The Paper Nest Dolls is called Prom Avery.


I printed this gorgeous girl on X-Press It Blending Card at a height of 3.7" and colored her with the following markers.

~Copics~
Skin: E04, E11, E21, E00, E000, E0000, R20, R30, R00
Hair: YR30, E53, E30, E50
Gown: RV34, RV11, RV52, R000
White Geln Pen
Clear Wink of Stella for bow


My card base is 5"x5" with outside layers 1/8" smaller in size. I fussy cut out the image and adhered her to my card with double sided foam tape. The gorgeous flowers from I Am Roses were glued onto my card using hot glue.


Thank you so much for stopping by today!

Until next time - Pam


Saturday, April 23, 2022

Decade Dolls: Have a FAR OUT Birthday!

Hi PND Fans! Betty here today. I just love the bright colors of the hippie era of the 60's and 70's. Although I was a young child, I still remember hearing some of the events, such as the Woodstock Music Festival and the Summer of Love. I still listen to the music from the 60's and 70's since they're my favorite. When Paper Nest Dolls released these Decade Dolls, I knew I wanted to color Hippie Ellie. I may have had an outfit just like her when I was younger! 


I first printed this digital stamp at 3-1/4" tall, colored it with Copic markers, then fussy cut it out.

Copic markers used:
Skin: E04, E11, E21, E00, E000
Hair: E39, YR24, YR23, YR20
Blue: B97, B95, B93, B91
Orange: YR09, YR07, YR04, YR12
Green: YG09
Pink: RV55, RV11
Brown: E57, E55, E53
White: C5, C3, C1, 0


The background patterned paper is free printable digital paper from Freepik. I imported it into Microsoft Publisher and cropped it to the size I needed. I printed it on a laser printer then trimmed it. I placed a purple cardstock mat behind it the adhered it to a top folding A2 card base.


I created the sentiment in Microsoft Publisher, printed it, then trimmed it to size, then adhered it to the card front. 

I adhered Hippie Ellie onto the card with double-sided adhesive foam tape and the card was finished. Such an easy, but cute card to make! I hope you give this a try!


Thank you for visiting and I hope you have a wonderful and creative day! ~Betty


Friday, April 22, 2022

Wellies!

Hi Crafty Friends,
It's April which means, rain and the best part of rain is cute rain boots. This is Secret Girl Emma from Paper Nest Dolls. I love her wellies so I created a whole card around them with rain boot background paper. I was also inspired by the pics of my niece and nephew splashing around in their wellies.

Make Crafty Friends Q & A:
Q: Do you have wellies?
A: Me? No but I need some, it's rainy in Chicago

Supplies:
Paper Nest Dolls Secret Girl Emma
Lawn Fawn Just Stitching Double Rectangle Dies

Friday, April 15, 2022

80s Girl Ellie is Saved By the Bell

Hi Crafty Friends,
Paper Nest Dolls has the COOLEST series of digis EVER! It's call the Decade Series and it has the cutest guys and gals from the 40s, 50s, 60s, 70s, 80s, etc. I am sharing my favorite character, 80s Girl Ellie with this bright colored card inspired by Saved By the Bell (see images below).

Make Crafty Friends Q & A:
Q: What was your favorite 80s TV show?
A: Me? Saved By the Bell


Supplies:
Paper Nest Dolls 80s Girl Ellie

Don't forget to subscribe, follow, and comment on my blog and on Instagram @MadeByMeghanK for your chance to win my April Prize

Tuesday, April 12, 2022

My Easter Basket Using Bunny Emma

My Easter Basket

Hello Crafty Friends! It's Laurie here! I am sharing My Easter Basket using Bunny Emma by Paper Nest Dolls for my Design Team Inspiration Project. Since Easter is this weekend, I thought an Easter basket would be fun with this cutie!

The Details of My Basket

For my basket, I picked out this pretty paper in soft Easter colours of pinks and purples. From that I pulled my Copic colour palette to colour Bunny Emma. The basket is really a purse die, but by using one handle instead of two, it transforms into a basket! I stamped the sentiment onto the cute, stitched pocket and added a die cut button from the paper.

Of course, I just had to decorate the back of the basket with another pocket and button. The pink is from the other side of the pretty floral paper. So, it all goes together beautifully. The finishing touch are a few matching ribbons to balance out Bunny Emma.


All that is left is to fill your basket with Easter grass and chocolates!

--------------------------

Copic Markers

Skin: E000/E00/E21/E11/E04
Hair/Boots: E37/E35/E33/E31
Purples: W17/W15/W12
Pinks: R859/R83/R81
Whites: C3/C0/0
Carrot: YR07/YR04/YR02/YR00/YG91/YG93/YG95/YG97

--------------------------

Card Recipe for My Easter Basket

Bunny Emma, Paper Nest Dolls
Paper Basics - Stamper's Select White Cardstock, Papertrey Ink
Stitched with Love 6” x 6” Paper Pad, P13
All Dressed Up Dies, Stampin’ Up!
Arrange a Wreath Stamp Set, Stampin’ Up!
Pretty in Pink Grosgrain Ribbon, Stampin’ Up!
Highland Heather Organdy Ribbon, Stampin’ Up!
Baker's Twine Essentials Pack, Stampin’ Up!
VersaFine Black Ink, Tsukineko
Easter Grass
Chocolates
Highland Heather Card Stock, Stampin’ Up!

--------------------------

Hope you like my Design Team Inspiration Project using
Bunny Emma by Paper Nest Dolls!

Thank you for stopping by!

Hugs,
Laurie
copyright © 2013 the paper nest · graphics by erica belton · web design by red peach designs